| (39 intermediate revisions by 22 users not shown) | |||
| Line 1: | Line 1: | ||
| ⚫ | '''Maps''' are the main type of endgame content in [[Path of Exile]]. By placing them in a [[map device]], maps can be consumed to create a randomized instance in which monsters can be fought. Like equipment, they come in {{c|normal|normal}}, {{c|magic|magic}}, {{c|rare|rare}}, and {{c|unique|unique}} [[rarity|rarities]], and can have their own special [[affixes]] which may make them more difficult, but also increases their potential rewards. Maps can also have [[quality]], which can be improved with {{il|Cartographer's Chisel|Cartographer's Chisels}}. Map drops are not affected by [[Partying|party size]].<ref name="PartyMaps" /> |
||
| ⚫ | |||
| ⚫ | '''Maps''' are the main type of endgame content in [[Path of Exile]]. By placing them in a [[map device]], maps can be consumed to create a randomized instance in which monsters can be fought. Like equipment, they come in {{c|normal|normal}}, {{c|magic|magic}}, {{c|rare|rare}}, and {{c|unique|unique}} [[rarity|rarities]] and have their own special [[affixes]] |
||
| − | Players cannot use maps until |
+ | Players cannot use maps until the [[Epilogue]] after completing [[Act 10]]. After completing [[Picking Up the Pieces]], a map device will be added to the player's [[hideout]]. |
==Atlas of Worlds== |
==Atlas of Worlds== |
||
{{main|Atlas of Worlds}} |
{{main|Atlas of Worlds}} |
||
| + | In the [[Epilogue]], [[Officer Kirac]] will give you a short series of quests that lead to the construction of a new map device for your hideout. He will also give you an unidentified Tier 1 magic map to start. |
||
| − | In the [[Epilogue]], [[Zana, Master Cartographer ]] is studying the [[Map device]] in [[The Templar Laboratory]]. She is astounded by the engineering and thaumaturgy required to build it and the places it can take you when given the right coordinates from a map. As it's easier to show than explain this miracle she gives you one of her maps. |
||
| − | After completing |
+ | After completing your first map, Kirac will show the player the [[Atlas of Worlds]]. The Atlas of Worlds visualizes how maps are connected to each other and form pathways between each map on the Atlas. There are four starting points, starting from the center of the Atlas. Maps are also grouped within 8 regions. |
| + | After some exploration, players will encounter [[Zana, Master Cartographer]] and a portal that leads to a Citadel, where [[Watchstone]]s can be placed. Watchstones are dropped by [[the Conquerors]] that rule the Atlas, who can be challenged by running maps within their influence region enough times. Once a Watchstone is socketed to a Citadel, it will empower all maps in that region, increasing their map level and adding new maps to the region. |
||
| − | Only connected maps and maps previously completed can drop from a map area. There are two exceptions to this rule: During Zana's missions where you can obtain maps without restrictions from your Atlas progression and unique maps can also drop if their base type can drop<ref>Bex_GGG (Nov 29, 2016). [[poeforum:1773975|Content Update 2.5.0 Patch Notes".]]''Official Path of Exile Forums.'' Retrieved March 28, 2017</ref>. |
||
| + | |||
| − | As players progress towards the center of the Atlas from the four corners, the tier of maps increases. In the center of the map are four [[Guardians of the Void]]. Defeating them gives players a chance to challenge the creator of the Atlas himself, [[the Shaper]]. |
||
| + | Only connected maps and maps previously completed can drop from a map area. In addition to these rules, this map drop pool only consists of maps that are currently visible on the atlas meaning maps that are removed from changing Watchstones are also removed from the map drop pool. There are exceptions that do not take your Atlas progression into account: During Zana's [[Master#Missions|Atlas Missions]] which gives you a choice of maps to open, unique maps that may also drop their base type, and various league content that may drop maps. |
||
| + | |||
| + | When four Watchstones are socketed to one region, it increases the Awakening Level of the Atlas. Awakening Levels increase map and influenced item drop chances and difficulty for every map on the Atlas, as well as enabling Awakened Atlas completion marks for maps at a certain level. Running maps in an awakened zone will also draw out [[the Awakener]], the leader of the Conquerors. |
||
| + | |||
| + | Regarding map drops, there is a 2x weighting for incomplete maps, and 4x weighting for adjacent maps, multiplicative.<ref name="map_weighting" /> |
||
===Modifiers=== |
===Modifiers=== |
||
{{Main|List of map mods}} |
{{Main|List of map mods}} |
||
| − | Each (non-unique) map can have up to 3 prefixes and 3 suffixes, just like other items. |
+ | Each (non-unique) map can have up to 3 prefixes and 3 suffixes, just like other items. Currency related to rarity also works the same, for example, an {{il|Orb of Alchemy}} will turn a basic map into a rare. Modifiers for maps change the properties of the map when one is in that map, thereby making it more difficult and (usually) resulting in increased item quantity for all drops on that map. High increased quantity also affects the drop rates of maps while in a particular map, so high modifiers will increase your chances at continuing to get map drops and finding higher level maps to use. [[Cartographer's Sextant]]s can affect neighbouring maps. Maps can be made considerably more difficult by using a [[Watchstone]] that increases the tier of the item. |
===Tiers=== |
===Tiers=== |
||
{{Map tier table|class=floatright}} |
{{Map tier table|class=floatright}} |
||
| − | There are 16 tiers of maps, each tier corresponding to an area level. The lowest tier drops during progression through the game and once inside the map, higher tier maps |
+ | There are 16 tiers of maps, each tier corresponding to an area level. The lowest tier drops during progression through the game and once inside the map, higher tier maps start dropping. Magic and rare monsters can drop maps that are +1 tier above and map bosses can drop +2 tiers above the map area the character is in, respectively. |
| − | Moving from one group of map tiers to the next often imposes a challenge as the higher tier maps |
+ | Moving from one group of map tiers to the next often imposes a challenge as the higher tier maps become harder to sustain. Furthermore, mid-tier and top-tier maps introduce higher values for the mods they can roll, new mods that are more challenging, and combinations of mods that aren't allowed to coexist on low-tier maps. |
===Upgrades=== |
===Upgrades=== |
||
| − | [[File: |
+ | [[File:PoE v3.8 Blight - Atlas Connections.png|thumb|v3.8 Blight Map Progression]] |
| − | If a player has three maps of the same type, these maps may be sold to a vendor to receive one map in exchange. This newly acquired map is one tier higher |
+ | If a player has three maps of the same type, these maps may be sold to a vendor to receive one map in exchange. This newly acquired map is of a map base one tier higher in the same region. Which map you get seems to be seeded by map, and different combinations of the same map can result in a different resulting map. |
===Unidentified Maps=== |
===Unidentified Maps=== |
||
| − | It is possible to put unidentified maps into the map device. There is a +30% [[quantity]] bonus when running these maps, but even when you enter the map the specific modifiers to the map are not revealed to you, even though the overall quantity, rarity and |
+ | It is possible to put unidentified maps into the map device. There is a +30% [[quantity]] bonus when running these maps, but even when you enter the map the specific modifiers to the map are not revealed to you, even though the overall quantity, rarity and pack size is. Some are easy to observe, burning or chilled ground are very obvious for example, but others are harder to know immediately (if there are enough obvious modifiers, together with the quantity, rarity and pack size you might be able to determine what the mods are, though). As such, it's recommended that you have a strong character before tackling such maps; otherwise the map could have many dangerous affixes to put your character in danger. Unidentified maps can be obtained as map drops, by corrupting an identified map or by vendoring 3x magic or rare maps of the same base type. |
This bonus does not apply to unidentified [[list of unique maps|unique maps]].<ref>Qarl (May 15, 2013). [[poeforum:382586|0.10.8b Patch Notes".]]''Official Path of Exile Forums.'' Retrieved February 2nd, 2014</ref> |
This bonus does not apply to unidentified [[list of unique maps|unique maps]].<ref>Qarl (May 15, 2013). [[poeforum:382586|0.10.8b Patch Notes".]]''Official Path of Exile Forums.'' Retrieved February 2nd, 2014</ref> |
||
| Line 42: | Line 46: | ||
In addition to these effects, all bosses of corrupted maps have a chance to drop ''Sacrifice'' [[Vaal Fragments]] or [[Vaal Skill Gems]]. |
In addition to these effects, all bosses of corrupted maps have a chance to drop ''Sacrifice'' [[Vaal Fragments]] or [[Vaal Skill Gems]]. |
||
| − | A corrupted map can't be modified with [[currency]] in any way, but effects from [[Zana's map device]] can still be crafted on it |
+ | A corrupted map can't be modified with [[currency]] in any way, but effects from [[Zana's map device]] can still be crafted on it. |
| + | |||
| + | ===Other maps=== |
||
| + | |||
| + | Maps can drop as a Shaper or Elder influenced map. These maps contain additional Shaper or Elder enemies and can drop Shaper or Elder [[influenced item]]s. They may also have the boss replaced with one of the [[Guardians of the Void]] or [[Elder Guardians]], which drop Shaper and Elder [[map fragment]]s when defeated. |
||
| + | |||
| + | [[Blighted Map]]s can drop from [[blight]]s. They contain battles and items unique to the [[blight league]]. |
||
| + | |||
| + | [[Zana]] missions have a chance to pick Maps from the [[Synthesis league]]. They contain battles and items unique to the league. |
||
===Map fragments=== |
===Map fragments=== |
||
{{main|Map fragment}} |
{{main|Map fragment}} |
||
| − | Map fragments are items that can be used in a [[map device]] to open portals to various high level areas |
+ | Map fragments are items that can be used in a [[map device]] to open portals to various high level areas with the full set in the proper alignment. Doubles or triples of the same piece will not work. Fragments can also be placed with a regular map to increase map item quantity. |
| + | |||
| + | [[Scarab]]s can also be used to add additional modifiers to the map, and [[Divine Vessel]]s are used to capture certain boss souls to upgrade a [[Pantheon]] power. |
||
==Maps by level== |
==Maps by level== |
||
| ⚫ | |||
Currently there are '''{{#cargo_query: table=items| fields=COUNT(DISTINCT items._pageName)| where=items.name NOT LIKE "%Shaped%" AND items.class="Maps" AND items.rarity="Normal" AND items.drop_enabled=true}} base maps and {{#cargo_query:table=items|fields=COUNT(DISTINCT items._pageName)|where=items.class="Maps" AND items.rarity="Unique" AND items.drop_enabled=true}} unique maps'''. Below is a list of all maps currently in game. |
Currently there are '''{{#cargo_query: table=items| fields=COUNT(DISTINCT items._pageName)| where=items.name NOT LIKE "%Shaped%" AND items.class="Maps" AND items.rarity="Normal" AND items.drop_enabled=true}} base maps and {{#cargo_query:table=items|fields=COUNT(DISTINCT items._pageName)|where=items.class="Maps" AND items.rarity="Unique" AND items.drop_enabled=true}} unique maps'''. Below is a list of all maps currently in game. |
||
| Line 59: | Line 74: | ||
'''Boss ratings:''' |
'''Boss ratings:''' |
||
| − | * 5: High and consistent damage output that is difficult to |
+ | * 5: High and consistent damage output that is difficult to avoid reliably; skipped by many players. |
* 4: High and consistent damage output that can be avoided reasonably well but still very dangerous. |
* 4: High and consistent damage output that can be avoided reasonably well but still very dangerous. |
||
* 3: Occasionally high damage output that can be avoided reasonably well. |
* 3: Occasionally high damage output that can be avoided reasonably well. |
||
| Line 67: | Line 82: | ||
{| class="wikitable sortable" |
{| class="wikitable sortable" |
||
|- |
|- |
||
| − | ! Map !! Level !! Tier !! Unique !! Layout<br />Rating !! Boss<br />Rating !! Tileset !! Unique Boss !! Number<br />of Bosses !! |
+ | ! Map !! Level !! Tier !! Unique !! Layout<br />Rating !! Boss<br />Rating !! Tileset !! Unique Boss !! Number<br />of Bosses !! Awakening Bonus Requirement |
|- |
|- |
||
| − | | {{il|Beach Map}} || 71 || 4 || {{no}} || A || 2 || The Beacon (1st half) || [[Glace]] || 1 || |
+ | | {{il|Beach Map}} || 71 || 4 || {{no}} || A || 2 || The Beacon (1st half) || [[Glace]] || 1 || Awakening Level 1<br />Map Tier 14 |
|- |
|- |
||
| − | | {{il|Dungeon Map}} || |
+ | | {{il|Dungeon Map}} || 74 || 7 || {{no}} || C || 4 || The Prison || [[Penitentiary Incarcerator]] || 1 || Awakening Level 6<br />Map Tier 16 |
|- |
|- |
||
| − | | {{il|Graveyard Map}} || |
+ | | {{il|Graveyard Map}} || 74 || 7 ||{{no}} || B || 3 || The Fellshrine Ruins || [[Steelpoint the Avenger]]<br />[[Champion of Frost]]<br />[[Thunderskull]] || 3 || Awakening Level 2<br />Map Tier 14 |
|- |
|- |
||
| − | | {{il|Lookout Map}} || |
+ | | {{il|Lookout Map}} || 69 || 2 || {{no}} || A || 3 || The Cathedral Rooftop || [[The Grey Plague]] || 1 || Awakening Level 1<br />Map Tier 14 |
|- |
|- |
||
| − | | {{il|Alleyways Map}} || |
+ | | {{il|Alleyways Map}} || 69 || 2 ||{{no}} || A || 3 || Oriath Square || [[Calderus]] || 1 || Awakening Level 7<br />Map Tier 16 |
|- |
|- |
||
| − | | {{il|Arid Lake Map}} || |
+ | | {{il|Arid Lake Map}} || 70 || 3 || {{no}} || B || 3 || The Fetid Pool || [[Drought-Maddened Rhoa]] || 1 || Awakening Level 3<br />Map Tier 14 |
|- |
|- |
||
| − | | {{il|Desert Map}} || |
+ | | {{il|Desert Map}} || 68 || 1 || {{no}} || C || 3 || The Dried Lake || [[Preethi, Eye-Pecker]] || 1 || Awakening Level 1<br />Map Tier 14 |
|- |
|- |
||
| − | | {{il|Flooded Mine Map}} || |
+ | | {{il|Flooded Mine Map}} || 70 || 3 ||{{no}} || B || 2 || The Submerged Passage || [[The Eroding One]] || 1 || Awakening Level 6<br />Map Tier 14 |
|- |
|- |
||
| − | | {{il|Marshes Map}} || |
+ | | {{il|Marshes Map}} || 72 || 5 ||{{no}} || B || 3 || The Mud Flats || [[Tore, Towering Ancient]] || 1 || Awakening Level 3<br />Map Tier 14 |
|- |
|- |
||
| − | | {{il|Pen Map}} || |
+ | | {{il|Pen Map}} || 70 || 3 ||{{no}} || A || 2 || The Slave Pens || [[Arwyn, the Houndmaster]]<br />Minibosses:<br />[[Lola, the Fierce]]<br />[[Rocco, the Bloodthirsty]] || 1 || Awakening Level 2<br />Map Tier 14 |
|- |
|- |
||
| − | | {{il|Arcade Map}} || |
+ | | {{il|Arcade Map}} || 72 || 5 ||{{no}} || B || 1 || The Marketplace || [[Herald of Ashes]]<br />[[Arcade Map|Herald of Thunder]] || 2 || Awakening Level 5<br />Map Tier 16 |
|- |
|- |
||
| − | | {{il|Burial Chambers Map}} || |
+ | | {{il|Burial Chambers Map}} || 72 || 5 ||{{no}} || B || 2 || The Crossroads<br />The Vaal Ruins || [[Witch of the Cauldron]] || 1 || Awakening Level 8<br />Map Tier 15 |
|- |
|- |
||
| − | | {{il|Cage Map}} || |
+ | | {{il|Cage Map}} || 71 || 4 ||{{no}} || A || 2 || The Slave Pens || [[Executioner Bloodwing]] || 1 || Awakening Level 8<br />Map Tier 16 |
|- |
|- |
||
| − | | {{il|Cells Map}} || |
+ | | {{il|Cells Map}} || 73 || 6 ||{{no}} || C || 4 || The Crematorium || [[Megaera]] || 1 || Awakening Level 5<br />Map Tier 15 |
|- |
|- |
||
| − | | {{il|Excavation Map}} || |
+ | | {{il|Excavation Map}} || 71 || 4 ||{{no}} || C || 1 || The Mines || [[Shrieker Eihal]]<br />[[Breaker Toruul]] || 2 || Awakening Level 2<br />Map Tier 14 |
|- |
|- |
||
| − | | {{il|Iceberg Map}} || |
+ | | {{il|Iceberg Map}} || 75 || 8 ||{{no}} || B || 3 || The Ascent || one random [[Mutewind]] [[Warband]] boss<br />with a supporting Warband || 1 || Awakening Level 8<br />Map Tier 15 |
|- |
|- |
||
| − | | {{il|Leyline Map}} || |
+ | | {{il|Leyline Map}} || 70 || 3 ||{{no}} || B || 2 || || [[Mirage of Bones]] || 1 || Awakening Level 3<br />Map Tier 15 |
|- |
|- |
||
| − | | {{il|Peninsula Map}} || |
+ | | {{il|Peninsula Map}} || 72 || 5 ||{{no}} || A || 2 || The Old Fields || [[Titan of the Grove]] || 1 || Awakening Level 2<br />Map Tier 14 |
|- |
|- |
||
| − | | {{il|Port Map}} || |
+ | | {{il|Port Map}} || 76 || 9 ||{{no}} || A || 4 || The Quay || [[Unravelling Horror]] || 1 || Awakening Level 3<br />Map Tier 15 |
|- |
|- |
||
| − | | {{il|Fungal Hollow Map}} || |
+ | | {{il|Fungal Hollow Map}} || 72 || 5 ||{{no}} || B || 3 || The Wetlands || [[Aulen Greychain]] || 1 || Awakening Level 7<br />Map Tier 14 |
|- |
|- |
||
| − | | [[Esh's Domain]] || 70 || {{n/a}} || {{no}} || {{n/a}} || 5 || The Chamber of Sins || [[Esh, Forked Thought]] || 1 || {{n/a}} |
+ | | [[Esh's Domain]] || 70 || {{n/a}} || {{no}} || {{n/a}} || 5 || The Chamber of Sins || [[Esh, Forked Thought]] || 1 || {{n/a}} |
|- |
|- |
||
| − | | [[Tul's Domain]] || 70 || {{n/a}} || {{no}} || {{n/a}} || 5 || The Fellshrine Ruins || [[Tul, Creeping Avalanche]] || 1 || {{n/a}} |
+ | | [[Tul's Domain]] || 70 || {{n/a}} || {{no}} || {{n/a}} || 5 || The Fellshrine Ruins || [[Tul, Creeping Avalanche]] || 1 || {{n/a}} |
|- |
|- |
||
| − | | [[Xoph's Domain]] || 70 || {{n/a}} || {{no}} || {{n/a}} || 5 || Kaom's Dream || [[Xoph, Dark Embers]] || 1 || {{n/a}} |
+ | | [[Xoph's Domain]] || 70 || {{n/a}} || {{no}} || {{n/a}} || 5 || Kaom's Dream || [[Xoph, Dark Embers]] || 1 || {{n/a}} |
|- |
|- |
||
| {{il|The Apex of Sacrifice}} || 70 || {{n/a}} || {{no}} || B || 5 || The Ancient Pyramid || [[Atziri, Queen of the Vaal]]<br />[[Q'ura]]<br />[[Y'ara'az]]<br />[[A'alai]]<br />[[Vessel of the Vaal]]<br />[[Vessel of the Vaal]] || 6 || {{n/a}} |
| {{il|The Apex of Sacrifice}} || 70 || {{n/a}} || {{no}} || B || 5 || The Ancient Pyramid || [[Atziri, Queen of the Vaal]]<br />[[Q'ura]]<br />[[Y'ara'az]]<br />[[A'alai]]<br />[[Vessel of the Vaal]]<br />[[Vessel of the Vaal]] || 6 || {{n/a}} |
||
|- |
|- |
||
| − | | {{il|Canyon Map}} || |
+ | | {{il|Canyon Map}} || 79 || 12 ||{{no}} || A || 5 || The Climb || [[Gnar, Eater of Carrion]]<br />[[Stonebeak, Battle Fowl]] || 2 || Awakening Level 4<br />Map Tier 15 |
|- |
|- |
||
| − | | {{il|Chateau Map}} || |
+ | | {{il|Chateau Map}} || 75 || 8 ||{{no}} || C || 4 || Labyrinth Outdoors ||[[Hephaeus, The Hammer]]|| 1 || Awakening Level 3<br />Map Tier 16 |
|- |
|- |
||
| − | | {{il|City Square Map}} || |
+ | | {{il|City Square Map}} || 71 || 4 ||{{no}} || B || 3 || Oriath Square || [[Carius, the Unnatural]]<br />[[Pileah, Corpse Burner]]<br />[[Pileah, Burning Corpse]] || 3 || Awakening Level 6<br />Map Tier 14 |
|- |
|- |
||
| − | | {{il|Courthouse Map}} || 81 || 14 || |
+ | | {{il|Courthouse Map}} || 81 || 14 ||{{no}} || C || 4 || The Templar Courts || [[Thena Moga, The Crimson Storm]]<br />[[Ion Darkshroud, The Hungering Blade]]<br />[[Bolt Brownfur, Earth Churner]] || 3 || Awakening Level 2<br />Map Tier 15 |
|- |
|- |
||
| − | | {{il|Glacier Map}} || |
+ | | {{il|Glacier Map}} || 69 || 2 || {{no}} || A || 3 || The Climb || [[Rek'tar, the Breaker]] || 1 || Awakening Level 1<br />Map Tier 14 |
|- |
|- |
||
| − | | {{il|Grotto Map}} || |
+ | | {{il|Grotto Map}} || 71 || 4 ||{{no}} || C || 3 || The Den || [[Void Anomaly]] || 1 || Awakening Level 2<br />Map Tier 15 |
|- |
|- |
||
| − | | {{il|Lighthouse Map}} || |
+ | | {{il|Lighthouse Map}} || 76 || 9 ||{{no}} || B || 3 || The Beacon || one random [[Redblade]] [[Warband]] boss<br />with a supporting Warband || 1 || Awakening Level 4<br />Map Tier 14 |
|- |
|- |
||
|{{il|The Perandus Manor}} |
|{{il|The Perandus Manor}} |
||
| − | | |
+ | |75 |
| − | | |
+ | |8 |
|{{Yes}} |
|{{Yes}} |
||
|B |
|B |
||
| Line 151: | Line 166: | ||
[[Rheniot, Servant of Prospero]] |
[[Rheniot, Servant of Prospero]] |
||
|7 |
|7 |
||
| + | | Awakening Level 3<br />Map Tier 16 |
||
| − | |5 |
||
|- |
|- |
||
| − | | {{il|Relic Chambers Map}} || |
+ | | {{il|Relic Chambers Map}} || 70 || 3 ||{{no}} || B || 2 || The Reliquary || [[Litanius, the Black Prayer]] || 1 || Awakening Level 5<br />Map Tier 14 |
|- |
|- |
||
| − | | {{il|Strand Map}} || 71 || 4 || |
+ | | {{il|Strand Map}} || 71 || 4 ||{{no}} || A || 3 || The Twilight Strand || [[Master of the Blade]]<br />[[Massier]] || 2 || Awakening Level 1<br />Map Tier 14 |
|- |
|- |
||
| − | | {{il|Whakawairua Tuahu}} || 71 || 4 || |
+ | | {{il|Whakawairua Tuahu}} || 71 || 4 ||{{yes}} || C || 4 || The Ship Graveyard || [[Tormented Temptress]]<br />Minibosses: [[Shades]] (for each player) || 1 || Awakening Level 1<br />Map Tier 14 |
|- |
|- |
||
| − | | {{il|Volcano Map}} || |
+ | | {{il|Volcano Map}} || 77 || 10 ||{{no}} || A || 4 || Kaom's Dream || [[Forest of Flames]] || 1 || Awakening Level 2<br />Map Tier 16 |
|- |
|- |
||
| − | | {{il|Ancient City Map}} || |
+ | | {{il|Ancient City Map}} || 73 || 6 ||{{no}} || C || 4 || The Vaal City || [[Lady Stormflay]] || 1 || Awakening Level 2<br />Map Tier 14 |
|- |
|- |
||
| − | | {{il|Barrows Map}} || |
+ | | {{il|Barrows Map}} || 69 || 2 ||{{no}} || C || 3 || The Wetlands<br />The Vaal Ruins || [[Beast of the Pits]] || 1 || Awakening Level 7<br />Map Tier 15 |
|- |
|- |
||
| − | | {{il|Channel Map}} || |
+ | | {{il|Channel Map}} || 71 || 4 ||{{no}} || C || 4 || The Aqueduct || [[The Winged Death]] || 1 || Awakening Level 2<br />Map Tier 15 |
|- |
|- |
||
| − | | {{il|Conservatory Map}} || 74 || 7 || |
+ | | {{il|Conservatory Map}} || 74 || 7 ||{{no}} || C || 3 || The Bath House || [[The Forgotten Soldier]] || 1 || Awakening Level 1<br />Map Tier 14 |
|- |
|- |
||
| − | | {{il|Haunted Mansion Map}} || |
+ | | {{il|Haunted Mansion Map}} || 68 || 1 ||{{no}} || C || 2 || || [[Barthol, the Pure]]<br />[[Barthol, the Corrupter]] || 1 || Awakening Level 1<br />Map Tier 14 |
|- |
|- |
||
| − | | {{il|Ivory Temple Map}} || |
+ | | {{il|Ivory Temple Map}} || 68 || 1 ||{{no}} || C || 3 || The Lunaris Temple Level 1 (Act 3)<br />The Imperial Gardens || one random [[The Perandus Manor|Perandus Manor]] boss || 1 || Awakening Level 1<br />Map Tier 14 |
|- |
|- |
||
| − | | {{il|Maze Map}} || |
+ | | {{il|Maze Map}} || 73 || 6 ||{{no}} || C || 4 || The Vaal Ruins || [[Shadow of the Vaal (unique monster)|Shadow of the Vaal]] || 1 || Awakening Level 5<br />Map Tier 14 |
|- |
|- |
||
| − | | {{il|Spider Lair Map}} || |
+ | | {{il|Spider Lair Map}} || 72 || 5 ||{{no}} || B || 3 || The Chamber of Sins<br />The Weaver's Chambers || [[Thraxia]] || 1 || Awakening Level 7<br />Map Tier 16 |
|- |
|- |
||
| − | | {{il|Sulphur Vents Map}} || |
+ | | {{il|Sulphur Vents Map}} || 68 || 1 ||{{no}} || C || 3 || The Boiling Lake || [[The Gorgon]] || 1 || Awakening Level 1<br />Map Tier 14 |
|- |
|- |
||
| − | | {{il|Toxic Sewer Map}} || |
+ | | {{il|Toxic Sewer Map}} || 75 || 8 ||{{no}} || C || 3 || The Sewers || [[Arachnoxia]] || 1 || Awakening Level 2<br />Map Tier 16 |
|- |
|- |
||
| − | | {{il|page=The Beachhead (Low Tier) (Betrayal)}} || 72 || 5 || {{yes}} || || || || || |
+ | | {{il|page=The Beachhead (Low Tier) (Betrayal)}} || 72 || 5 || {{yes}} || || || || || {{n/a}} |
|- |
|- |
||
| − | | {{il|Academy Map}} || |
+ | | {{il|Academy Map}} || 77 || 10 ||{{no}} || C || 4 || The Archives || [[The Arbiter of Knowledge]] || 1 || Awakening Level 2<br />Map Tier 14 |
|- |
|- |
||
| − | | {{il|Atoll Map}} || |
+ | | {{il|Atoll Map}} || 73 || 6 ||{{no}} || A || 4 || The Ledge || [[Puruna, the Challenger]] || 1 || Awakening Level 3<br />Map Tier 14 |
|- |
|- |
||
| − | | {{il|Maelström of Chaos}} || |
+ | | {{il|Maelström of Chaos}} || 73 || 6 || {{yes}} || A || 3 || The Ledge || [[Merveil, the Reflection]]<br />[[Merveil, the Returned]]<br />Minibosses:<br />[[Heir of Flame]]<br />[[Heir of Storm]] || 1 || Awakening Level 3<br />Map Tier 14 |
|- |
|- |
||
| − | | {{il|Ashen Wood Map}} || |
+ | | {{il|Ashen Wood Map}} || 70 || 3 ||{{no}} || B || 2 || The Ashen Fields || [[Lord of the Ashen Arrow]] || 1 || Awakening Level 1<br />Map Tier 14 |
|- |
|- |
||
| − | | {{il|Cemetery Map}} || |
+ | | {{il|Cemetery Map}} || 79 || 12 ||{{no}} || B || 5 || The Fellshrine Ruins || [[Erebix, Light's Bane]] || 1 || Awakening Level 2<br />Map Tier 14 |
|- |
|- |
||
| − | | {{il|Hallowed Ground}} || |
+ | | {{il|Hallowed Ground}} || 79 || 12 ||{{yes}} || B || 4 || The Crypt || [[Maker of Mires]]<br />Minibosses:<br />[[Jaesyn]]<br />[[Jik'shah]]<br />[[Balah, Duke]]<br />[[Kruug, the Frayed]] || 1 || Awakening Level 2<br />Map Tier 14 |
|- |
|- |
||
| − | | {{il|Fields Map}} || |
+ | | {{il|Fields Map}} || 71 || 4 ||{{no}} || C || 2 || The Imperial Fields || [[Drek, Apex Hunter]]<br />Minibosses:<br />[[Enthralled Dire Wolf]]<br />[[Enraptured Hellion]] || 1 || Awakening Level 1<br />Map Tier 14 |
|- |
|- |
||
| − | | {{il|Jungle Valley Map}} || 72 || 5 || |
+ | | {{il|Jungle Valley Map}} || 72 || 5 ||{{no}} || A || 2 || The Riverways || [[Queen of the Great Tangle]] || 1 || Awakening Level 1<br />Map Tier 14 |
|- |
|- |
||
| − | | {{il|Mausoleum Map}} || |
+ | | {{il|Mausoleum Map}} || 70 || 3 ||{{no}} || B || 2 || The Ossuary (Act 10) || [[Tolman, the Exhumer]] || 1 || Awakening Level 1<br />Map Tier 14 |
|- |
|- |
||
| − | | {{il|Phantasmagoria Map}} || 73 || 6 || |
+ | | {{il|Phantasmagoria Map}} || 73 || 6 ||{{no}} || A || 2 || The Belly of the Beast Level 1 || [[Erythrophagia]] || 1 || Awakening Level 7<br />Map Tier 16 |
|- |
|- |
||
| − | | {{il|Thicket Map}} || 69 || 2 || |
+ | | {{il|Thicket Map}} || 69 || 2 ||{{no}} || B || 3 || The Dread Thicket || [[The Primal One]] || 1 || Awakening Level 7<br />Map Tier 16 |
|- |
|- |
||
| − | | {{il|Underground Sea Map}} || |
+ | | {{il|Underground Sea Map}} || 76 || 9 ||{{no}} || C || 2 || Merveil's Caverns || [[Merveil, the Reflection]] || 1 || Awakening Level 1<br />Map Tier 14 |
|- |
|- |
||
| − | | {{il|Oba's Cursed Trove}} || |
+ | | {{il|Oba's Cursed Trove}} || 76 || 9 ||{{yes}} || B || 1 || The Submerged Passage<br />The Crypt<br />The Chamber of Sins || (none) || 0 || Awakening Level 1<br />Map Tier 14 |
|- |
|- |
||
| − | | {{il|Wharf Map}} || |
+ | | {{il|Wharf Map}} || 70 || 3 ||{{no}} || A || 2 || The Docks || [[Stone of the Currents]] || 1 || Awakening Level 3<br />Map Tier 14 |
|- |
|- |
||
| − | | {{il|Arachnid Nest Map}} || |
+ | | {{il|Arachnid Nest Map}} || 76 || 9 ||{{no}} || B || 5 || The Weaver's Chambers || [[Spinner of False Hope]] || 1 || Awakening Level 6<br />Map Tier 14 |
|- |
|- |
||
| − | | {{il|Bazaar Map}} || |
+ | | {{il|Bazaar Map}} || 77 || 10 || {{no}} || B || 3 || The Marketplace || [[Ancient Sculptor]]<br />Minibosses:<br />[[Marceus the Defaced]]<br />[[The Goddess of Purity]] || 1 || Awakening Level 2<br />Map Tier 15 |
|- |
|- |
||
| − | | {{il|Bone Crypt Map}} || |
+ | | {{il|Bone Crypt Map}} || 75 || 8 ||{{no}} || C || 2 || The Catacombs || [[Xixic, High Necromancer]] || 1 || Awakening Level 2<br />Map Tier 15 |
|- |
|- |
||
| − | | {{il|Olmec's Sanctum}} || |
+ | | {{il|Olmec's Sanctum}} || 75 || 8 ||{{yes}} || A || 4 || The Catacombs || [[Olmec, the All Stone]]<br />Minibosses:<br />[[Achioc, the Glacier]]<br />[[Zorioc, the Storm]]<br />[[Levioc, the Volcano]]<br />[[Izioc, the Abyss]] || 1 || Awakening Level 2<br />Map Tier 15 |
|- |
|- |
||
| − | | {{il|Coral Ruins Map}} || |
+ | | {{il|Coral Ruins Map}} || 77 || 10 ||{{no}} || C || 4 || || [[Captain Tanner Lightfoot]] || 1 || Awakening Level 1<br />Map Tier 14 |
|- |
|- |
||
| − | | {{il|Dunes Map}} || |
+ | | {{il|Dunes Map}} || 75 || 8 ||{{no}} || B || 3 || The Vastiri Desert || [[The Blacksmith]] || 1 || Awakening Level 2<br />Map Tier 14 |
|- |
|- |
||
| − | | {{il|Pillars of Arun}} || |
+ | | {{il|Pillars of Arun}} || 75 || 8 ||{{yes}} || C || 3 || The Vastiri Desert || [[Talin, Faithbreaker]] || 1 || Awakening Level 2<br />Map Tier 16 |
|- |
|- |
||
| − | | {{il|Gardens Map}} || |
+ | | {{il|Gardens Map}} || 78 || 11 ||{{no}} || C || 2 || The Imperial Gardens || [[Sallazzang]] || 1 || Awakening Level 2<br />Map Tier 15 |
|- |
|- |
||
| − | | {{il|Lava Chamber Map}} || |
+ | | {{il|Lava Chamber Map}} || 77 || 10 ||{{no}} || B || 3 || The Crematorium || [[Fire and Fury]] || 1 || Awakening Level 2<br />Map Tier 16 |
|- |
|- |
||
| − | | {{il|Ramparts Map}} || |
+ | | {{il|Ramparts Map}} || 72 || 5 ||{{no}} || A || 3 || The Sarn Ramparts || [[Legius Garhall]] || 1 || Awakening Level 2<br />Map Tier 15 |
|- |
|- |
||
| − | | {{il|Residence Map}} || |
+ | | {{il|Residence Map}} || 74 || 7 ||{{no}} || B || 5 || The Sceptre of God || [[Excellis Aurafix]] || 1 || Awakening Level 7<br />Map Tier 14 |
|- |
|- |
||
| − | | {{il|Underground River Map}} || |
+ | | {{il|Underground River Map}} || 76 || 9 ||{{no}} || A || 3 || The Caverns || [[It That Fell]] || 1 || Awakening Level 7<br />Map Tier 16 |
|- |
|- |
||
| − | | {{il|Caer Blaidd, Wolfpack's Den}} || |
+ | | {{il|Caer Blaidd, Wolfpack's Den}} || 76 || 9 ||{{yes}} || B || 4 || The Caverns || [[Solus, Pack Alpha]]<br />[[Storm Eye]]<br />[[Winterfang]] || 3 || Awakening Level 7<br />Map Tier 16 |
|- |
|- |
||
| − | | {{il|Armoury Map}} || 69 || 2 || |
+ | | {{il|Armoury Map}} || 69 || 2 ||{{no}} || B || 2 || Labyrinth Indoors || [[Warmonger]] || 1 || Awakening Level 6<br />Map Tier 16 |
|- |
|- |
||
| − | | {{il|Courtyard Map}} || |
+ | | {{il|Courtyard Map}} || 73 || 6 ||{{no}} || B || 4 || The Imperial Gardens || [[Oriath's Vengeance]]<br />[[Oriath's Vigil]]<br />[[Oriath's Virtue]] || 3 || Awakening Level 2<br />Map Tier 15 |
|- |
|- |
||
| − | | {{il|The Vinktar Square}} || |
+ | | {{il|The Vinktar Square}} || 73 || 6 ||{{yes}} || C || 3 || The Battlefront || [[Avatar of Thunder]]<br />Minibosses:<br />[[Guardian of the North]]<br />[[Guardian of the East]]<br />[[Guardian of the South]]<br />[[Guardian of the West]] || 1 || Awakening Level 2<br />Map Tier 15 |
|- |
|- |
||
| − | | {{il|Geode Map}} || |
+ | | {{il|Geode Map}} || 77 || 10 ||{{no}} || C || 3 || The Quarry || [[Avatar of Undoing]] || 1 || Awakening Level 7<br />Map Tier 15 |
|- |
|- |
||
| − | | {{il|Infested Valley Map}} || |
+ | | {{il|Infested Valley Map}} || 78 || 11 || {{no}} || B || 4 || The Wetlands (Act 6) || [[Gorulis, Will-Thief]] || 1 || Awakening Level 2<br />Map Tier 14 |
|- |
|- |
||
| − | | {{il|Laboratory Map}} || |
+ | | {{il|Laboratory Map}} || 74 || 7 ||{{no}} || B || 3 || The Reliquary || [[Riftwalker]] || 1 || Awakening Level 7<br />Map Tier 14 |
|- |
|- |
||
| − | | {{il|Mineral Pools Map}} || |
+ | | {{il|Mineral Pools Map}} || 76 || 9 ||{{no}} || A || 3 || Merveil's Caverns || [[Merveil, the Reflection]]<br />[[Merveil, the Returned]]<br />Minibosses:<br />[[Heir of Flame]]<br />[[Heir of Storm]] || 1 || Awakening Level 5<br />Map Tier 14 |
|- |
|- |
||
| − | | {{il|Mud Geyser Map}} || |
+ | | {{il|Mud Geyser Map}} || 73 || 6 ||{{no}} || B || 5 || The Fetid Pool || [[Tunneltrap]] || 1 || Awakening Level 2<br />Map Tier 14 |
|- |
|- |
||
| − | | {{il|Overgrown Ruin Map}} || |
+ | | {{il|Overgrown Ruin Map}} || 73 || 6 ||{{no}} || C || || The Chamber of Sins || [[Visceris]]<br />Minibosses:<br />[[Akaveesh]]<br />[[M'uneh]] || 1 || Awakening Level 8<br />Map Tier 15 |
|- |
|- |
||
| − | | {{il|Shore Map}} || |
+ | | {{il|Shore Map}} || 76 || 9 ||{{no}} || B || 3 || The Coast || [[Belcer, the Pirate Lord]] || 1 || Awakening Level 2<br />Map Tier 15 |
|- |
|- |
||
| − | | {{il|Mao Kun}} || |
+ | | {{il|Mao Kun}} || 76 || 9 ||{{yes}} || C || 4 || The Tidal Island || [[Fairgraves, Never Dying]] || 1 || Awakening Level 2<br />Map Tier 15 |
|- |
|- |
||
| − | | {{il|The Pale Court}} || 75 || {{n/a}} || {{no}} || A || 5 || The Ancient Pyramid || [[Eber, the Plaguemaw]]<br />[[Inya, the Unbearable Whispers]]<br />[[Volkuur, the Unbreathing Queen]]<br />[[Yriel, the Feral Lord]] || 4 || {{n/a}} |
+ | | {{il|The Pale Court}} || 75 || {{n/a}} || {{no}} || A || 5 || The Ancient Pyramid || [[Eber, the Plaguemaw]]<br />[[Inya, the Unbearable Whispers]]<br />[[Volkuur, the Unbreathing Queen]]<br />[[Yriel, the Feral Lord]] || 4 || {{n/a}} |
|- |
|- |
||
| − | | {{il|Tropical Island Map}} || |
+ | | {{il|Tropical Island Map}} || 72 || 5 || {{no}} || A || 2 || The Southern Forest || [[Blood Progenitor]]<br />Minibosses:<br />[[Spirit of Aidan]]<br />[[Spirit of Nadia]] || 1 || Awakening Level 1<br />Map Tier 14 |
|- |
|- |
||
| − | | [[Uul-Netol's Domain]] || 75 || {{n/a}} || {{no}} || {{n/a}} || 5 || The Library || [[Uul-Netol, Unburdened Flesh]] || 1 || {{n/a}} |
+ | | [[Uul-Netol's Domain]] || 75 || {{n/a}} || {{no}} || {{n/a}} || 5 || The Library || [[Uul-Netol, Unburdened Flesh]] || 1 || {{n/a}} |
|- |
|- |
||
| − | | {{il|Untainted Paradise}} || 75 || 8 || {{yes}} || B || 2 || The Southern Forest || [[Clutch Queen]]<br />[[Colossal Spitter]]<br />[[Elder Devourer]]<br />[[Great Maw]]<br />[[Prime Ape]]<br />[[The First Rhoa]] || 6 || {{n/a}} |
+ | | {{il|Untainted Paradise}} || 75 || 8 || {{yes}} || B || 2 || The Southern Forest || [[Clutch Queen]]<br />[[Colossal Spitter]]<br />[[Elder Devourer]]<br />[[Great Maw]]<br />[[Prime Ape]]<br />[[The First Rhoa]] || 6 || {{n/a}} |
|- |
|- |
||
| − | | {{il|Vaal Pyramid Map}} || |
+ | | {{il|Vaal Pyramid Map}} || 79 || 12 ||{{no}} || C || 5 || The Ancient Pyramid || [[The Fallen Queen]]<br />[[The Hollow Lady]]<br />[[The Broken Prince]] || 3 || Awakening Level 2<br />Map Tier 14 |
|- |
|- |
||
| − | | {{il|Vaults of Atziri}} || |
+ | | {{il|Vaults of Atziri}} || 79 || 12 ||{{yes}} || A || 0 || The Vaal Ruins || (none) || 0 || Awakening Level 2<br />Map Tier 14 |
|- |
|- |
||
| − | | {{il|Arena Map}} || |
+ | | {{il|Arena Map}} || 74 || 7 ||{{no}} || B || 4 || The Grand Arena || [[Avatar of the Forge]]<br />[[Avatar of the Huntress]]<br />[[Avatar of the Skies]] || 3 || Awakening Level 2<br />Map Tier 16 |
|- |
|- |
||
| − | | {{il|Estuary Map}} || |
+ | | {{il|Estuary Map}} || 75 || 8 ||{{no}} || B || 1 || || [[Sumter the Twisted]]<br />Minibosses:<br />[[Flarus]]<br />[[Frosis]] || 1 || Awakening Level 7<br />Map Tier 16 |
|- |
|- |
||
| − | | {{il|Moon Temple Map}} || 76 || 9 || |
+ | | {{il|Moon Temple Map}} || 76 || 9 ||{{no}} || C || 4 || The Lunaris Temple (Act 8) || [[Sebbert, Crescent's Point]] || 1 || Awakening Level 2<br />Map Tier 14 |
|- |
|- |
||
| − | | {{il|The Twilight Temple}} || 76 || 9 || |
+ | | {{il|The Twilight Temple}} || 76 || 9 ||{{yes}} || || || The Lunaris Temple (Act 8)<br />The Solaris Temple || [[Helial, the Day Unending]]<br />[[Selenia, the Endless Night]]<br />Minibosses:<br />[[Opid, Helial's Herald]]<br />[[Arteth, Selenia's Herald]]<br />[[Aloris, the First Light]]<br />[[Nebria, the Last Light]] || 1 || Awakening Level 2<br />Map Tier 14 |
|- |
|- |
||
| − | | {{il|Museum Map}} || |
+ | | {{il|Museum Map}} || 78 || 11 || {{no}} || C || 5 || The Library || [[He of Many Pieces]] || 1 || Awakening Level 2<br />Map Tier 14 |
|- |
|- |
||
| − | | {{il|The Putrid Cloister}} || |
+ | | {{il|The Putrid Cloister}} || 78 || 11 || {{yes}} || C || 4 || The Library || [[Headmistress Braeta]] || 1 || Awakening Level 2<br />Map Tier 14 |
|- |
|- |
||
| − | | {{il|Plateau Map}} || |
+ | | {{il|Plateau Map}} || 77 || 10 || {{no}} || A || 3 || The Ridge || [[Puruna, the Challenger]]<br />[[Poporo, the Highest Spire]] || 2 || Awakening Level 2<br />Map Tier 14 |
|- |
|- |
||
| − | | {{il|Scriptorium Map}} || |
+ | | {{il|Scriptorium Map}} || 75 || 8 ||{{no}} || A || 4 || The Library<br />The Crypt || [[Gisale, Thought Thief]] || 1 || Awakening Level 3<br />Map Tier 14 |
|- |
|- |
||
| − | | {{il|Sepulchre Map}} || |
+ | | {{il|Sepulchre Map}} || 77 || 10 ||{{no}} || || || The Ossuary (Act 5)<br />The Rotting Core (Doedre's Despair) || [[Doedre the Defiler]] || 1 || Awakening Level 3<br />Map Tier 15 |
|- |
|- |
||
| − | | {{il|Temple Map}} || |
+ | | {{il|Temple Map}} || 77 || 10 ||{{no}} || C || 3 || The Solaris Temple || [[Jorus, Sky's Edge]] || 1 || Awakening Level 2<br />Map Tier 14 |
|- |
|- |
||
| − | | {{il|Poorjoy's Asylum}} || |
+ | | {{il|Poorjoy's Asylum}} || 77 || 10 || {{yes}} || B || 5 || The Lunaris Temple Level 2 (Act 3) || [[Mistress Hyseria]] || 1 || Awakening Level 2<br />Map Tier 14 |
|- |
|- |
||
| − | | {{il|Tower Map}} || |
+ | | {{il|Tower Map}} || 80 || 13 ||{{no}} || B || 4 || Shavronne's Tower || [[Liantra]]<br />[[Bazur]] || 2 || Awakening Level 8<br />Map Tier 15 |
|- |
|- |
||
| − | | {{il|Vault Map}} || |
+ | | {{il|Vault Map}} || 74 || 7 ||{{no}} || B || 4 || Labyrinth Indoors || [[Guardian of the Vault]] || 1 || Awakening Level 2<br />Map Tier 14 |
|- |
|- |
||
| − | | {{il|Waste Pool Map}} || |
+ | | {{il|Waste Pool Map}} || 73 || 6 ||{{no}} || C || 3 || The Sewers || [[Portentia, the Foul]] || 1 || Awakening Level 2<br />Map Tier 15 |
|- |
|- |
||
| − | | {{il|Arachnid Tomb Map}} || |
+ | | {{il|Arachnid Tomb Map}} || 70 || 3 ||{{no}} || A || 2 || The Temple of Decay || [[Hybrid Widow]] || 1 || Awakening Level 2<br />Map Tier 15 |
|- |
|- |
||
| − | | {{il|Belfry Map}} || |
+ | | {{il|Belfry Map}} || 80 || 13 ||{{no}} || A || 5 || The Cathedral Rooftop || [[Lord of the Grey]] || 1 || Awakening Level 3<br />Map Tier 16 |
|- |
|- |
||
| − | | {{il|Bog Map}} || 77 || |
+ | | {{il|Bog Map}} || 77 || 10 || {{no}} || B || 3 || The Fetid Pool || [[Skullbeak]] || 1 || Awakening Level 2<br />Map Tier 14 |
|- |
|- |
||
| − | | {{il|Cursed Crypt Map}} || |
+ | | {{il|Cursed Crypt Map}} || 71 || 4 ||{{no}} || C || 3 || The Crypt || [[Pagan Bishop of Agony]] || 1 || Awakening Level 1<br />Map Tier 14 |
|- |
|- |
||
| − | | {{il|The Coward's Trial}} || |
+ | | {{il|The Coward's Trial}} || 71 || 4 ||{{yes}} || A || 2 || The Crypt || [[Infector of Dreams]] || 1 || Awakening Level 1<br />Map Tier 14 |
|- |
|- |
||
| − | | {{il|Orchard Map}} || |
+ | | {{il|Orchard Map}} || 81 || 14 || {{no}} || C || 4 || The Imperial Gardens || [[Vision of Justice]] || 1 || Awakening Level 2<br />Map Tier 15 |
|- |
|- |
||
| − | | {{il|Pier Map}} || |
+ | | {{il|Pier Map}} || 70 || 3 ||{{no}} || C || 2 || The Docks || [[Ancient Architect]] || 1 || Awakening Level 1<br />Map Tier 14 |
|- |
|- |
||
| − | | {{il|Precinct Map}} || |
+ | | {{il|Precinct Map}} || 78 || 11 ||{{no}} || B || 4 || The Slums || three random [[Rogue Exiles]] || 3 || Awakening Level 5<br />Map Tier 15 |
|- |
|- |
||
| − | | {{il|Shipyard Map}} || |
+ | | {{il|Shipyard Map}} || 79 || 12 ||{{no}} || B || || The Docks || one random [[Brinerot]] [[Warband]] boss<br />with a supporting Warband || 1 || Awakening Level 5<br />Map Tier 16 |
|- |
|- |
||
| − | | {{il|Siege Map}} || |
+ | | {{il|Siege Map}} || 78 || 11 ||{{no}} || A || 4 || The Ruined Square || [[Tahsin, Warmaker]] || 1 || Awakening Level 7<br />Map Tier 16 |
|- |
|- |
||
| − | | {{il|page=The Beachhead (Mid Tier) (Betrayal)}} || 77 || 10 || {{yes}} || || || || || || |
+ | | {{il|page=The Beachhead (Mid Tier) (Betrayal)}} || 77 || 10 || {{yes}} || || || || || || {{n/a}} |
|- |
|- |
||
| − | | {{il|Wasteland Map}} || |
+ | | {{il|Wasteland Map}} || 81 || 14 ||{{no}} || C || 4 || The Dried Lake || [[The Brittle Emperor (unique monster)|The Brittle Emperor]] || 1 || Awakening Level 1<br />Map Tier 14 |
|- |
|- |
||
| − | | {{il|Colonnade Map}} || 78 || |
+ | | {{il|Colonnade Map}} || 78 || 11 ||{{no}} || A || 3 || The Battlefront || [[Tyrant (unique monster)|Tyrant]] || 1 || Awakening Level 1<br />Map Tier 14 |
|- |
|- |
||
| − | | {{il|Coves Map}} || |
+ | | {{il|Coves Map}} || 80 || 13 ||{{no}} || B || 4 || The Ship Graveyard || [[Telvar, the Inebriated]]<br />[[Pirate Treasure]] || 2 || Awakening Level 1<br />Map Tier 14 |
|- |
|- |
||
| − | | {{il|Factory Map}} || |
+ | | {{il|Factory Map}} || 75 || 8 ||{{no}} || C || 1 || The Refinery || [[Pesquin, the Mad Baron]] || 1 || Awakening Level 5<br />Map Tier 14 |
|- |
|- |
||
| − | | {{il|Mesa Map}} || |
+ | | {{il|Mesa Map}} || 72 || 5 ||{{no}} || A || 2 || The Ledge || [[Oak the Mighty]] || 1 || Awakening Level 2<br />Map Tier 14 |
|- |
|- |
||
| − | | {{il|Lair Map}} || 78 || 11 || |
+ | | {{il|Lair Map}} || 78 || 11 ||{{no}} || B ||5|| The Caverns || [[Lycius, Midnight's Howl]] || 1 || Awakening Level 2<br />Map Tier 14 |
|- |
|- |
||
| − | | {{il|Pit Map}} || |
+ | | {{il|Pit Map}} || 75 || 8 ||{{no}} || C || 3 || Daresso's Dream || [[Olof, Son of the Headsman]] || 1 || Awakening Level 5<br />Map Tier 14 |
|- |
|- |
||
| − | | {{il|Primordial Pool Map}} || |
+ | | {{il|Primordial Pool Map}} || 73 || 6 ||{{no}} || A || 3 || Maligaro's Sanctum || [[Nightmare's Omen]] || 1 || Awakening Level 2<br />Map Tier 14 |
|- |
|- |
||
| − | | {{il|Promenade Map}} || |
+ | | {{il|Promenade Map}} || 73 || 6 ||{{no}} || A || 3 || The Grand Promenade || [[Blackguard Avenger]]<br />[[Blackguard Tempest]] || 2 || Awakening Level 8<br />Map Tier 16 |
|- |
|- |
||
| − | | {{il|Hall of Grandmasters}} || |
+ | | {{il|Hall of Grandmasters}} || 73 || 6 ||{{yes}} || A || 5 || The Grand Promenade || (none)* || 0 || Awakening Level 8<br />Map Tier 16 |
|- |
|- |
||
| − | | {{il|Spider Forest Map}} || |
+ | | {{il|Spider Forest Map}} || 74 || 7 ||{{no}} || C || 2 || The Northern Forest || [[Enticer of Rot]]<br />Miniboss: [[Avatar of Rot]] || 1 || Awakening Level 6<br />Map Tier 14 |
|- |
|- |
||
| − | | {{il|Waterways Map}} || |
+ | | {{il|Waterways Map}} || 74 || 7 ||{{no}} || C || 3 || The Aqueduct || [[Fragment of Winter]] || 1 || Awakening Level 1<br />Map Tier 14 |
|- |
|- |
||
| − | | {{il|Castle Ruins Map}} || |
+ | | {{il|Castle Ruins Map}} || 76 || 9 ||{{no}} || B || 2 || The Broken Bridge || [[Leif, the Swift-Handed]] || 1 || Awakening Level 3<br />Map Tier 15 |
|- |
|- |
||
| − | | {{il|Crystal Ore Map}} || |
+ | | {{il|Crystal Ore Map}} || 81 || 14 ||{{no}} || B || 5 || The Crystal Veins || [[Champion of the Hollows]]<br />[[Lord of the Hollows]]<br />[[Messenger of the Hollows]] || 3 || Awakening Level 2<br />Map Tier 14 |
|- |
|- |
||
| − | | {{il|Defiled Cathedral Map}} || |
+ | | {{il|Defiled Cathedral Map}} || 80 || 13 ||{{no}} || A || 1 || The Desecrated Chambers || [[Woad, Mockery of Man]] || 1 || Awakening Level 2<br />Map Tier 14 |
|- |
|- |
||
| − | | {{il|Necropolis Map}} || |
+ | | {{il|Necropolis Map}} || 75 || 8 ||{{no}} || C || 3 || The Crypt || [[Burtok, Conjuror of Bones]] || 1 || Awakening Level 8<br />Map Tier 15 |
|- |
|- |
||
| − | | {{il|Death and Taxes}} || |
+ | | {{il|Death and Taxes}} || 75 || 8 ||{{yes}} || A || 5 || The Crypt || [[Avatar of Apocalypse]]<br />Minibosses:<br />[[Avatar of Ash]]<br />[[Avatar of Winter]]<br />[[Avatar of Silence]]<br /> || 1 || Awakening Level 8<br />Map Tier 15 |
|- |
|- |
||
| − | | {{il|Overgrown Shrine Map}} || |
+ | | {{il|Overgrown Shrine Map}} || 74 || 7 ||{{no}} || C || 4 || The Chamber of Sins<br />The Rotting Core (Maligaro's Misery) || [[Maligaro the Mutilator]] || 1 || Awakening Level 7<br />Map Tier 16 |
|- |
|- |
||
| − | | {{il|Acton's Nightmare}} || |
+ | | {{il|Acton's Nightmare}} || 74 || 7 ||{{yes}} || C || 2 || The Chamber of Sins || [[Rose]]<br />[[Thorn]] || 2 || Awakening Level 7<br />Map Tier 16 |
|- |
|- |
||
| − | | {{il|Racecourse Map}} || |
+ | | {{il|Racecourse Map}} || 74 || 7 ||{{no}} || A || 3 || The Grand Arena || [[Shredder of Gladiators]]<br />[[Crusher of Gladiators]]<br />[[Bringer of Blood]] || 3 || Awakening Level 2<br />Map Tier 16 |
|- |
|- |
||
| − | | {{il|Summit Map}} || |
+ | | {{il|Summit Map}} || 82 || 15 ||{{no}} || || || The Ascent || [[Mephod, the Earth Scorcher]] || 1 || Awakening Level 1<br />Map Tier 14 |
|- |
|- |
||
| − | | {{il|Primordial Blocks Map}} || |
+ | | {{il|Primordial Blocks Map}} || 81 || 14 ||{{no}} || C || 4 || The Prison || [[Shock and Horror]] || 1 || Awakening Level 4<br />Map Tier 15 |
|- |
|- |
||
| − | | {{il|Villa Map}} || |
+ | | {{il|Villa Map}} || 76 || 9 ||{{no}} || C || 3 || The Sceptre of God || [[The High Templar]] || 1 || Awakening Level 1<br />Map Tier 14 |
|- |
|- |
||
| − | | {{il|Arsenal Map}} || |
+ | | {{il|Arsenal Map}} || 76 || 9 ||{{no}} || C || 2 || The Grain Gate || [[The Steel Soul]] || 1 || Awakening Level 2<br />Map Tier 14 |
|- |
|- |
||
| − | | {{il|Caldera Map}} || |
+ | | {{il|Caldera Map}} || 82 || 15 ||{{no}} || C || 4 || Kaom's Stronghold || [[The Infernal King]] || 1 || Awakening Level 2<br />Map Tier 15 |
|- |
|- |
||
| − | | {{il|Core Map}} || |
+ | | {{il|Core Map}} || 79 || 12 ||{{no}} || C || 5 || The Harvest || [[Eater of Souls]]<br />Minibosses:<br />[[Prodigy of Pain]]<br />[[Prodigy of Hexes]]<br />[[Prodigy of Darkness]] || 1 || Awakening Level 6<br />Map Tier 15 |
|- |
|- |
||
| − | | [[Chayula's Domain]] || 80 || {{n/a}} || {{no}} || {{n/a}} || 5 || The Mines || [[Chayula, Who Dreamt]] || 1 || {{n/a}} |
+ | | [[Chayula's Domain]] || 80 || {{n/a}} || {{no}} || {{n/a}} || 5 || The Mines || [[Chayula, Who Dreamt]] || 1 || {{n/a}} |
|- |
|- |
||
| − | | {{il|Desert Spring Map}} || |
+ | | {{il|Desert Spring Map}} || 82 || 15 ||{{no}} || || || The Oasis || [[Terror of the Infinite Drifts]]<br />Minibosses:<br />[[Tamipin]]<br />[[Tamulus]] || 1 || Awakening Level 2<br />Map Tier 15 |
|- |
|- |
||
| − | | {{il|Ghetto Map}} || |
+ | | {{il|Ghetto Map}} || 75 || 8 || {{no}} || C || 3 || The Slums || [[Hephaeus, The Hammer]] || 1 || Awakening Level 2<br />Map Tier 14 |
|- |
|- |
||
| − | | {{il|Malformation Map}} || |
+ | | {{il|Malformation Map}} || 78 || 11 || {{no}} || C || 4 || The Belly of the Beast Level 2 || [[Nightmare Manifest]] || 1 || Awakening Level 4<br />Map Tier 15 |
|- |
|- |
||
| − | | {{il|Park Map}} || |
+ | | {{il|Park Map}} || 79 || 12 ||{{no}} || || || Oriath Square || [[Suncaller Asha]] || 1 || Awakening Level 2<br />Map Tier 16 |
|- |
|- |
||
| − | | {{il|Shrine Map}} || 80 || 13 || |
+ | | {{il|Shrine Map}} || 80 || 13 ||{{no}} || B || 4 || The Lunaris Temple Level 2 (Act 3) || [[Piety the Empyrean]] || 1 || Awakening Level 5<br />Map Tier 15 |
|- |
|- |
||
| − | | {{il|Terrace Map}} || 80 || |
+ | | {{il|Terrace Map}} || 80 || 13 ||{{no}} || C || 4 || The High Gardens || [[Varhesh, Shimmering Aberration]] || 1 || Awakening Level 2<br />Map Tier 14 |
|- |
|- |
||
| − | | {{il|The Alluring Abyss}} || 80 || {{n/a}} || {{no}} || B || 5 || The Ancient Pyramid || [[Atziri, Queen of the Vaal]]<br />[[Q'ura]]<br />[[Y'ara'az]]<br />[[A'alai]]<br />[[Vessel of the Vaal]]<br />[[Vessel of the Vaal]] || 6 || {{n/a}} |
+ | | {{il|The Alluring Abyss}} || 80 || {{n/a}} || {{no}} || B || 5 || The Ancient Pyramid || [[Atziri, Queen of the Vaal]]<br />[[Q'ura]]<br />[[Y'ara'az]]<br />[[A'alai]]<br />[[Vessel of the Vaal]]<br />[[Vessel of the Vaal]] || 6 || {{n/a}} |
|- |
|- |
||
| − | | {{il|Acid Caverns Map}} || |
+ | | {{il|Acid Caverns Map}} || 82 || 15 ||{{no}} || A || 4 || The Fetid Pool || two random [[Renegades]] [[Warband]] bosses<br />with a supporting Warband || 2 || Awakening Level 8<br />Map Tier 15 |
|- |
|- |
||
| − | | {{il|Colosseum Map}} || |
+ | | {{il|Colosseum Map}} || 79 || 12 || {{no}} || A || 5 || Daresso's Dream<br />The Grand Arena || [[Ambrius, Legion Slayer]] || 1 || Awakening Level 7<br />Map Tier 16 |
|- |
|- |
||
| − | | {{il|Crimson Temple Map}} || |
+ | | {{il|Crimson Temple Map}} || 78 || 11 || {{no}} || || || The Ossuary<br />The Desecrated Chambers || [[The Sanguine Siren]] || 1 || Awakening Level 6<br />Map Tier 15 |
|- |
|- |
||
| − | | {{il|Dark Forest Map}} || 81 || 14 || |
+ | | {{il|Dark Forest Map}} || 81 || 14 ||{{no}} || B || 5 || The Western Forest || [[The Cursed King (boss)|The Cursed King]] || 1 || Awakening Level 2<br />Map Tier 15 |
|- |
|- |
||
| − | | {{il|Dig Map}} || |
+ | | {{il|Dig Map}} || 78 || 11 ||{{no}} || || || The Quarry || [[Stalker of the Endless Dunes]]<br />Miniboss: [[The Vulture Queen]] || 1 || Awakening Level 3<br />Map Tier 16 |
|- |
|- |
||
| − | | {{il|Palace Map}} || |
+ | | {{il|Palace Map}} || 82 || 15 ||{{no}} || C || 5 || The Upper Sceptre of God || [[God's Chosen]]<br />[[The Hallowed Husk]] || 1 || Awakening Level 8<br />Map Tier 15 |
|- |
|- |
||
| − | | {{il|Plaza Map}} || |
+ | | {{il|Plaza Map}} || 80 || 13 ||{{no}} || B || 5 || Labyrinth Outdoors || [[The Goddess]] || 1 || Awakening Level 3<br />Map Tier 14 |
|- |
|- |
||
| − | | {{il|Basilica Map}} || |
+ | | {{il|Basilica Map}} || 81 || 14 ||{{no}} || B || || The Chamber of Innocence || [[Konley, the Unrepentant]]<br />[[The Cleansing Light]] || 1 || Awakening Level 3<br />Map Tier 16 |
|- |
|- |
||
| − | | {{il|Carcass Map}} || |
+ | | {{il|Carcass Map}} || 79 || 12 ||{{no}} || || || The Belly of the Beast (Act 9) || [[Amalgam of Nightmares]] || 1 || Awakening Level 7<br />Map Tier 14 |
|- |
|- |
||
| − | | {{il|Lava Lake Map}} || |
+ | | {{il|Lava Lake Map}} || 79 || 12 || {{no}} || A || 5 || The Karui Fortress<br />Kaom's Stronghold || [[Kitava, the Insatiable]] || 1 || Awakening Level 8<br />Map Tier 15 |
|- |
|- |
||
| − | | {{il|Reef Map}} || |
+ | | {{il|Reef Map}} || 80 || 13 ||{{no}} || B || 4 || The Brine King's Reef || [[Nassar, Lion of the Seas]] || 1 || Awakening Level 8<br />Map Tier 16 |
|- |
|- |
||
| − | | {{il|Sunken City Map}} || |
+ | | {{il|Sunken City Map}} || 80 || 13 ||{{no}} || || || The Causeway || [[Armala, the Widow]] || 1 || Awakening Level 2<br />Map Tier 14 |
|- |
|- |
||
| − | | {{il|page=The Beachhead (High Tier) (Betrayal)}} || 82 || 15 || {{yes}} || || || || || || |
+ | | {{il|page=The Beachhead (High Tier) (Betrayal)}} || 82 || 15 || {{yes}} || || || || || || {{n/a}} |
|- |
|- |
||
| − | | {{il|Forge of the Phoenix Map}} || 83 || 16 || {{no}} || B || 5 || The Crematorium || [[Guardian of the Phoenix]] || 1 || |
+ | | {{il|Forge of the Phoenix Map}} || 83 || 16 || {{no}} || B || 5 || The Crematorium || [[Guardian of the Phoenix]] || 1 || {{n/a}} |
|- |
|- |
||
| − | | {{il|Lair of the Hydra Map}} || 83 || 16 || {{no}} || A || 5 || The Sewers || [[Guardian of the Hydra]] || 1 || |
+ | | {{il|Lair of the Hydra Map}} || 83 || 16 || {{no}} || A || 5 || The Sewers || [[Guardian of the Hydra]] || 1 || {{n/a}} |
|- |
|- |
||
| − | | {{il|Maze of the Minotaur Map}} || 83 || 16 || {{no}} || A || 5 || The Caverns || [[Guardian of the Minotaur]] || 1 || |
+ | | {{il|Maze of the Minotaur Map}} || 83 || 16 || {{no}} || A || 5 || The Caverns || [[Guardian of the Minotaur]] || 1 || {{n/a}} |
|- |
|- |
||
| − | | {{il|Pit of the Chimera Map}} || 83 || 16 || {{no}} || B || 5 || Daresso's Dream || [[Guardian of the Chimera]] || 1 || |
+ | | {{il|Pit of the Chimera Map}} || 83 || 16 || {{no}} || B || 5 || Daresso's Dream || [[Guardian of the Chimera]] || 1 || {{n/a}} |
|- |
|- |
||
| − | | {{il|Vaal Temple Map}} || 83 || 16 || {{no}} || C || 5 || The Ancient Pyramid || [[K'aj A'alai]]<br />[[K'aj Q'ura]]<br />[[K'aj Y'ara'az]] || 3 || |
+ | | {{il|Vaal Temple Map}} || 83 || 16 || {{no}} || C || 5 || The Ancient Pyramid || [[K'aj A'alai]]<br />[[K'aj Q'ura]]<br />[[K'aj Y'ara'az]] || 3 || Awakening Level 8<br />Map Tier 16 |
|- |
|- |
||
| {{il|The Shaper's Realm}} || 84 || {{n/a}} || {{no}} || B || 5 || Several || [[The Shaper]] || 1 || {{n/a}} |
| {{il|The Shaper's Realm}} || 84 || {{n/a}} || {{no}} || B || 5 || Several || [[The Shaper]] || 1 || {{n/a}} |
||
|- |
|- |
||
| − | | {{il|Crater Map}} || 71 || 4 || |
+ | | {{il|Crater Map}} || 71 || 4 ||{{no}} || || || Azurite Mine || [[Megaera]] || 1 || Awakening Level 6<br />Map Tier 14 |
|} |
|} |
||
* The Hall of Grandmasters is populated by exiles submitted by Grandmaster Supporters, however these are not Unique Bosses. |
* The Hall of Grandmasters is populated by exiles submitted by Grandmaster Supporters, however these are not Unique Bosses. |
||
==Divination cards== |
==Divination cards== |
||
| − | + | The following [[divination card]]s can be exchanged for maps: |
|
| + | {{Query base items |
||
| − | * A set of 3 {{il|Cartographer's Delight}} can be exchanged for a [[normal]] map of tier 5. |
||
| + | |where=items.class="Divination Card" |
||
| − | * A set of 6 {{il|The Explorer}} can be exchanged for a [[rare]] [[corrupted]] map. |
||
| + | AND items.description LIKE "%Map%" |
||
| − | * A set of 8 {{il|Lost Worlds}} can be exchanged for a [[normal]] map of tier 15. |
||
| + | OR items.description LIKE "%Mao Kun%" |
||
| − | * A set of 4 {{il|The Surveyor}} can be exchanged for a [[normal]] map of tier 14. |
||
| + | OR items.description LIKE "%Poorjoy's Asylum%" |
||
| − | * A set of 5 {{il|The Trial}} can be exchanged for a [[rare]] [[Map#Corrupted_Maps|corrupted]] map of tier 15. |
||
| + | OR items.description LIKE "%The Perandus Manor%" |
||
| + | OR items.description LIKE "%The Putrid Cloister%" |
||
| + | OR items.description LIKE "%The Twilight Temple%" |
||
| + | OR items.description LIKE "%Vaults of Atziri%" |
||
| + | |stack_size=1 |
||
| + | |description=1 |
||
| + | }} |
||
==Achievements== |
==Achievements== |
||
| Line 461: | Line 483: | ||
==Version history== |
==Version history== |
||
| + | {{Version history table header}} |
||
| − | {{VersionHistoryTable|table=collapsed|width=100%}} |
||
| − | {{ |
+ | {{Version history table row|3.9.0}} |
| + | * The Atlas has been completely reworked. There's a new storyline, new boss encounters and new ways to customise your Atlas. |
||
| + | {{Version history table row|3.1.0}} |
||
* Added 32 new maps including two new Unique maps. |
* Added 32 new maps including two new Unique maps. |
||
* The entire [[Atlas]] has been reworked. Many map names have changed, as have their balance, tier and position on the Atlas. Many maps have also had their boss fights swapped or completely reworked. |
* The entire [[Atlas]] has been reworked. Many map names have changed, as have their balance, tier and position on the Atlas. Many maps have also had their boss fights swapped or completely reworked. |
||
| − | {{ |
+ | {{Version history table row|3.0.0}} |
* The map device in [[The Eternal Laboratory]] is now decoration only. The new area for opening maps is [[The Templar Laboratory]]. |
* The map device in [[The Eternal Laboratory]] is now decoration only. The new area for opening maps is [[The Templar Laboratory]]. |
||
| − | {{ |
+ | {{Version history table row|2.5.0}} |
| + | * Unique Maps can now drop if you have completed their equivalent base type on the Atlas. |
||
| + | {{Version history table row|2.4.0}} |
||
* [[Atlas of Worlds]] has been introduced, the whole map system has been overhauled. |
* [[Atlas of Worlds]] has been introduced, the whole map system has been overhauled. |
||
* Existing maps are changed. |
* Existing maps are changed. |
||
| Line 474: | Line 500: | ||
* Tier 1 maps now drop from level 58 onwards in Merciless. |
* Tier 1 maps now drop from level 58 onwards in Merciless. |
||
* The extra map drop chance that occurs at the map boss is now on the final map boss you kill, rather than the first one. |
* The extra map drop chance that occurs at the map boss is now on the final map boss you kill, rather than the first one. |
||
| − | {{ |
+ | {{Version history table row|2.3.0}} |
| − | *In maps, the count of monsters remaining is now shown when you press tab to see map information. |
+ | * In maps, the count of monsters remaining is now shown when you press tab to see map information. |
| − | {{ |
+ | {{Version history table row|2.1.0}} |
* Added two new Unique Maps: [[The Vinktar Square]] and [[Caer Blaidd, Wolfpack's Den]]. |
* Added two new Unique Maps: [[The Vinktar Square]] and [[Caer Blaidd, Wolfpack's Den]]. |
||
* Maps found in mission subareas of maps are now allocated to the maker of the original map. |
* Maps found in mission subareas of maps are now allocated to the maker of the original map. |
||
| − | {{ |
+ | {{Version history table row|2.0.0}} |
* We have introduced a new series of maps. You can recognise these by their volcanic Karui Stone art rather than the old grey tablets. |
* We have introduced a new series of maps. You can recognise these by their volcanic Karui Stone art rather than the old grey tablets. |
||
* The new maps range in level from 68-82. |
* The new maps range in level from 68-82. |
||
| Line 489: | Line 515: | ||
* Maps from the old progression no longer drop. They can be played to find maps from the new progression. |
* Maps from the old progression no longer drop. They can be played to find maps from the new progression. |
||
* Old maps have their old art and mods. Crafting them yields mods from the old progression. |
* Old maps have their old art and mods. Crafting them yields mods from the old progression. |
||
| − | {{ |
+ | {{Version history table row|1.2.0}} |
* Zana allows you to open end-game Maps at a personal Map Device in your [[hideout]]. Mods can be purchased that affect the Map as it is opened. |
* Zana allows you to open end-game Maps at a personal Map Device in your [[hideout]]. Mods can be purchased that affect the Map as it is opened. |
||
| − | {{ |
+ | {{Version history table row|1.0.0}} |
* Added eight new end-game Maps including a new tier of level 78 maps. |
* Added eight new end-game Maps including a new tier of level 78 maps. |
||
| − | {{ |
+ | {{Version history table row|0.10.1}} |
| + | * Added 11 new types of '''Maps''': {{il|page=Arsenal Map (Original)|name=Arsenal}}, {{il|page=Arcade Map (Original)|name=Arcade}}, {{il|page=Ghetto Map (Original)|name=Ghetto}}, {{il|page=Promenade Map (Original)|name=Promenade}}, {{il|page=Temple Map (Original)|name=Temple}}, {{il|page=Colonnade Map (Original)|name=Colonnade}}, {{il|page=Bazaar Map (Original)|name=Bazaar}}, {{il|page=Lava Chamber Map (Original)|name=Crematorium}}, {{il|page=Precinct Map (Original)|name=Precinct}}, {{il|page=Shipyard Map (Original)|name=Shipyard}} and {{il|page=Shrine Map (Original)|name=Shrine}}. |
||
| + | {{Version history table row|0.10.0}} |
||
| + | * Start of open beta. Old map item are wiped from server. |
||
| + | * We've added a new Map tileset (based on The Docks) and have changed the overall ordering of Maps. |
||
| + | * The following [[Map]] areas have been updated so that they're substantially different in layout to before: {{il|page=Spider Forest Map (Original)|name=Spider Forest}}, {{il|page=Jungle Valley Map (Original)|name=Jungle Valley}}, {{il|page=Waste Pool Map (Original)|name=Waste Pool}}, {{il|page=Ashen Wood Map (Original)|name=Dry Woods}}, {{il|page=Cemetery Map (Original)|name=Cemetery}}, {{il|page=Flooded Mine Map (Original)|name=Mine}}, {{il|page=Underground Sea Map (Original)|name=Underground Sea}}, {{il|page=Bog Map (Original)|name=Bog}}, {{il|page=Plateau Map (Original)|name=Plateau}} and {{il|page=Dunes Map (Original)|name=Dunes}}. |
||
| + | {{Version history table row|0.9.12c}} |
||
* The player's "Increased Item Quantity" stat does not affect the drop rate of Map items any more. It does still increase the drop rate of everything else inside Maps. |
* The player's "Increased Item Quantity" stat does not affect the drop rate of Map items any more. It does still increase the drop rate of everything else inside Maps. |
||
| − | {{ |
+ | {{Version history table row|0.9.11c}} |
| + | *Enabled the [[Toxic Sewer Map|Sewers]] and [[Lava Chamber Map|Crematorium]] Maps. |
||
| + | {{Version history table row|0.9.11}} |
||
* Removed the Maelstrom of Chaos. It has been replaced by the Maps end-game. For more information about Maps, please read the [[poeforum:55194|development diary]]. |
* Removed the Maelstrom of Chaos. It has been replaced by the Maps end-game. For more information about Maps, please read the [[poeforum:55194|development diary]]. |
||
** The item quantity bonus that a Map has (due to its Mods) will affect the drop rate of Map items within that Map. |
** The item quantity bonus that a Map has (due to its Mods) will affect the drop rate of Map items within that Map. |
||
** The drop rate of the Map items themselves is not increased by the additional players. |
** The drop rate of the Map items themselves is not increased by the additional players. |
||
| + | * Added 45 Map areas, each with its own boss. |
||
|} |
|} |
||
==References== |
==References== |
||
{{reflist|refs= |
{{reflist|refs= |
||
| + | <ref name="PartyMaps">{{cite web |
||
| − | <ref name="PartyMaps">{{cite web|author=Chris|date=June 26, 2012|title=Dev Diary: End-game Maps|url=https://www.pathofexile.com/forum/view-thread/55194|publisher=Official Path of Exile Forums|accessdate=January 24, 2016}}</ref> |
||
| + | |title=Dev Diary: End-game Maps |
||
| − | |||
| + | |url=https://www.pathofexile.com/forum/view-thread/55194 |
||
| + | |author=Chris |
||
| + | |date=June 26, 2012 |
||
| + | |accessdate=January 24, 2016 |
||
| + | |publisher=Official Path of Exile Forums |
||
| + | }}</ref> |
||
| + | <ref name = "map_weighting">{{cite web |
||
| + | |title = PSA: Map drops don't work as we've been let to believe (probably a bug?) |
||
| + | |url = https://www.reddit.com/r/pathofexile/comments/axg2s4/psa_map_drops_dont_work_as_weve_been_let_to/ehtp0xm/ |
||
| + | |author = RhysGGG |
||
| + | |date = March 5, 2019 |
||
| + | |accessdate = March 5, 2019 |
||
| + | |publisher = Path of Exile subreddit |
||
| + | }}</ref> |
||
}} |
}} |
||
| − | {{ |
+ | {{Navbox maps}} |
| + | {{Navbox Atlas of Worlds}} |
||
| + | [[Category:Maps| ]] |
||
| − | [[ |
+ | [[de:Karte]] |
Revision as of 01:05, 1 March 2021
Maps are the main type of endgame content in Path of Exile. By placing them in a map device, maps can be consumed to create a randomized instance in which monsters can be fought. Like equipment, they come in normal, magic, rare, and unique rarities, and can have their own special affixes which may make them more difficult, but also increases their potential rewards. Maps can also have quality, which can be improved with ![]() Cartographer's ChiselsCartographer's ChiselStack Size: 20Improves the quality of a mapRight click this item then left click a map to apply it. Has greater effect on lower-rarity maps. The maximum quality is 20%.
Cartographer's ChiselsCartographer's ChiselStack Size: 20Improves the quality of a mapRight click this item then left click a map to apply it. Has greater effect on lower-rarity maps. The maximum quality is 20%.
Shift click to unstack.![]() . Map drops are not affected by party size.[1]
. Map drops are not affected by party size.[1]
Players cannot use maps until the Epilogue after completing Act 10. After completing Picking Up the Pieces, a map device will be added to the player's hideout.
Atlas of Worlds
In the Epilogue, Officer Kirac will give you a short series of quests that lead to the construction of a new map device for your hideout. He will also give you an unidentified Tier 1 magic map to start.
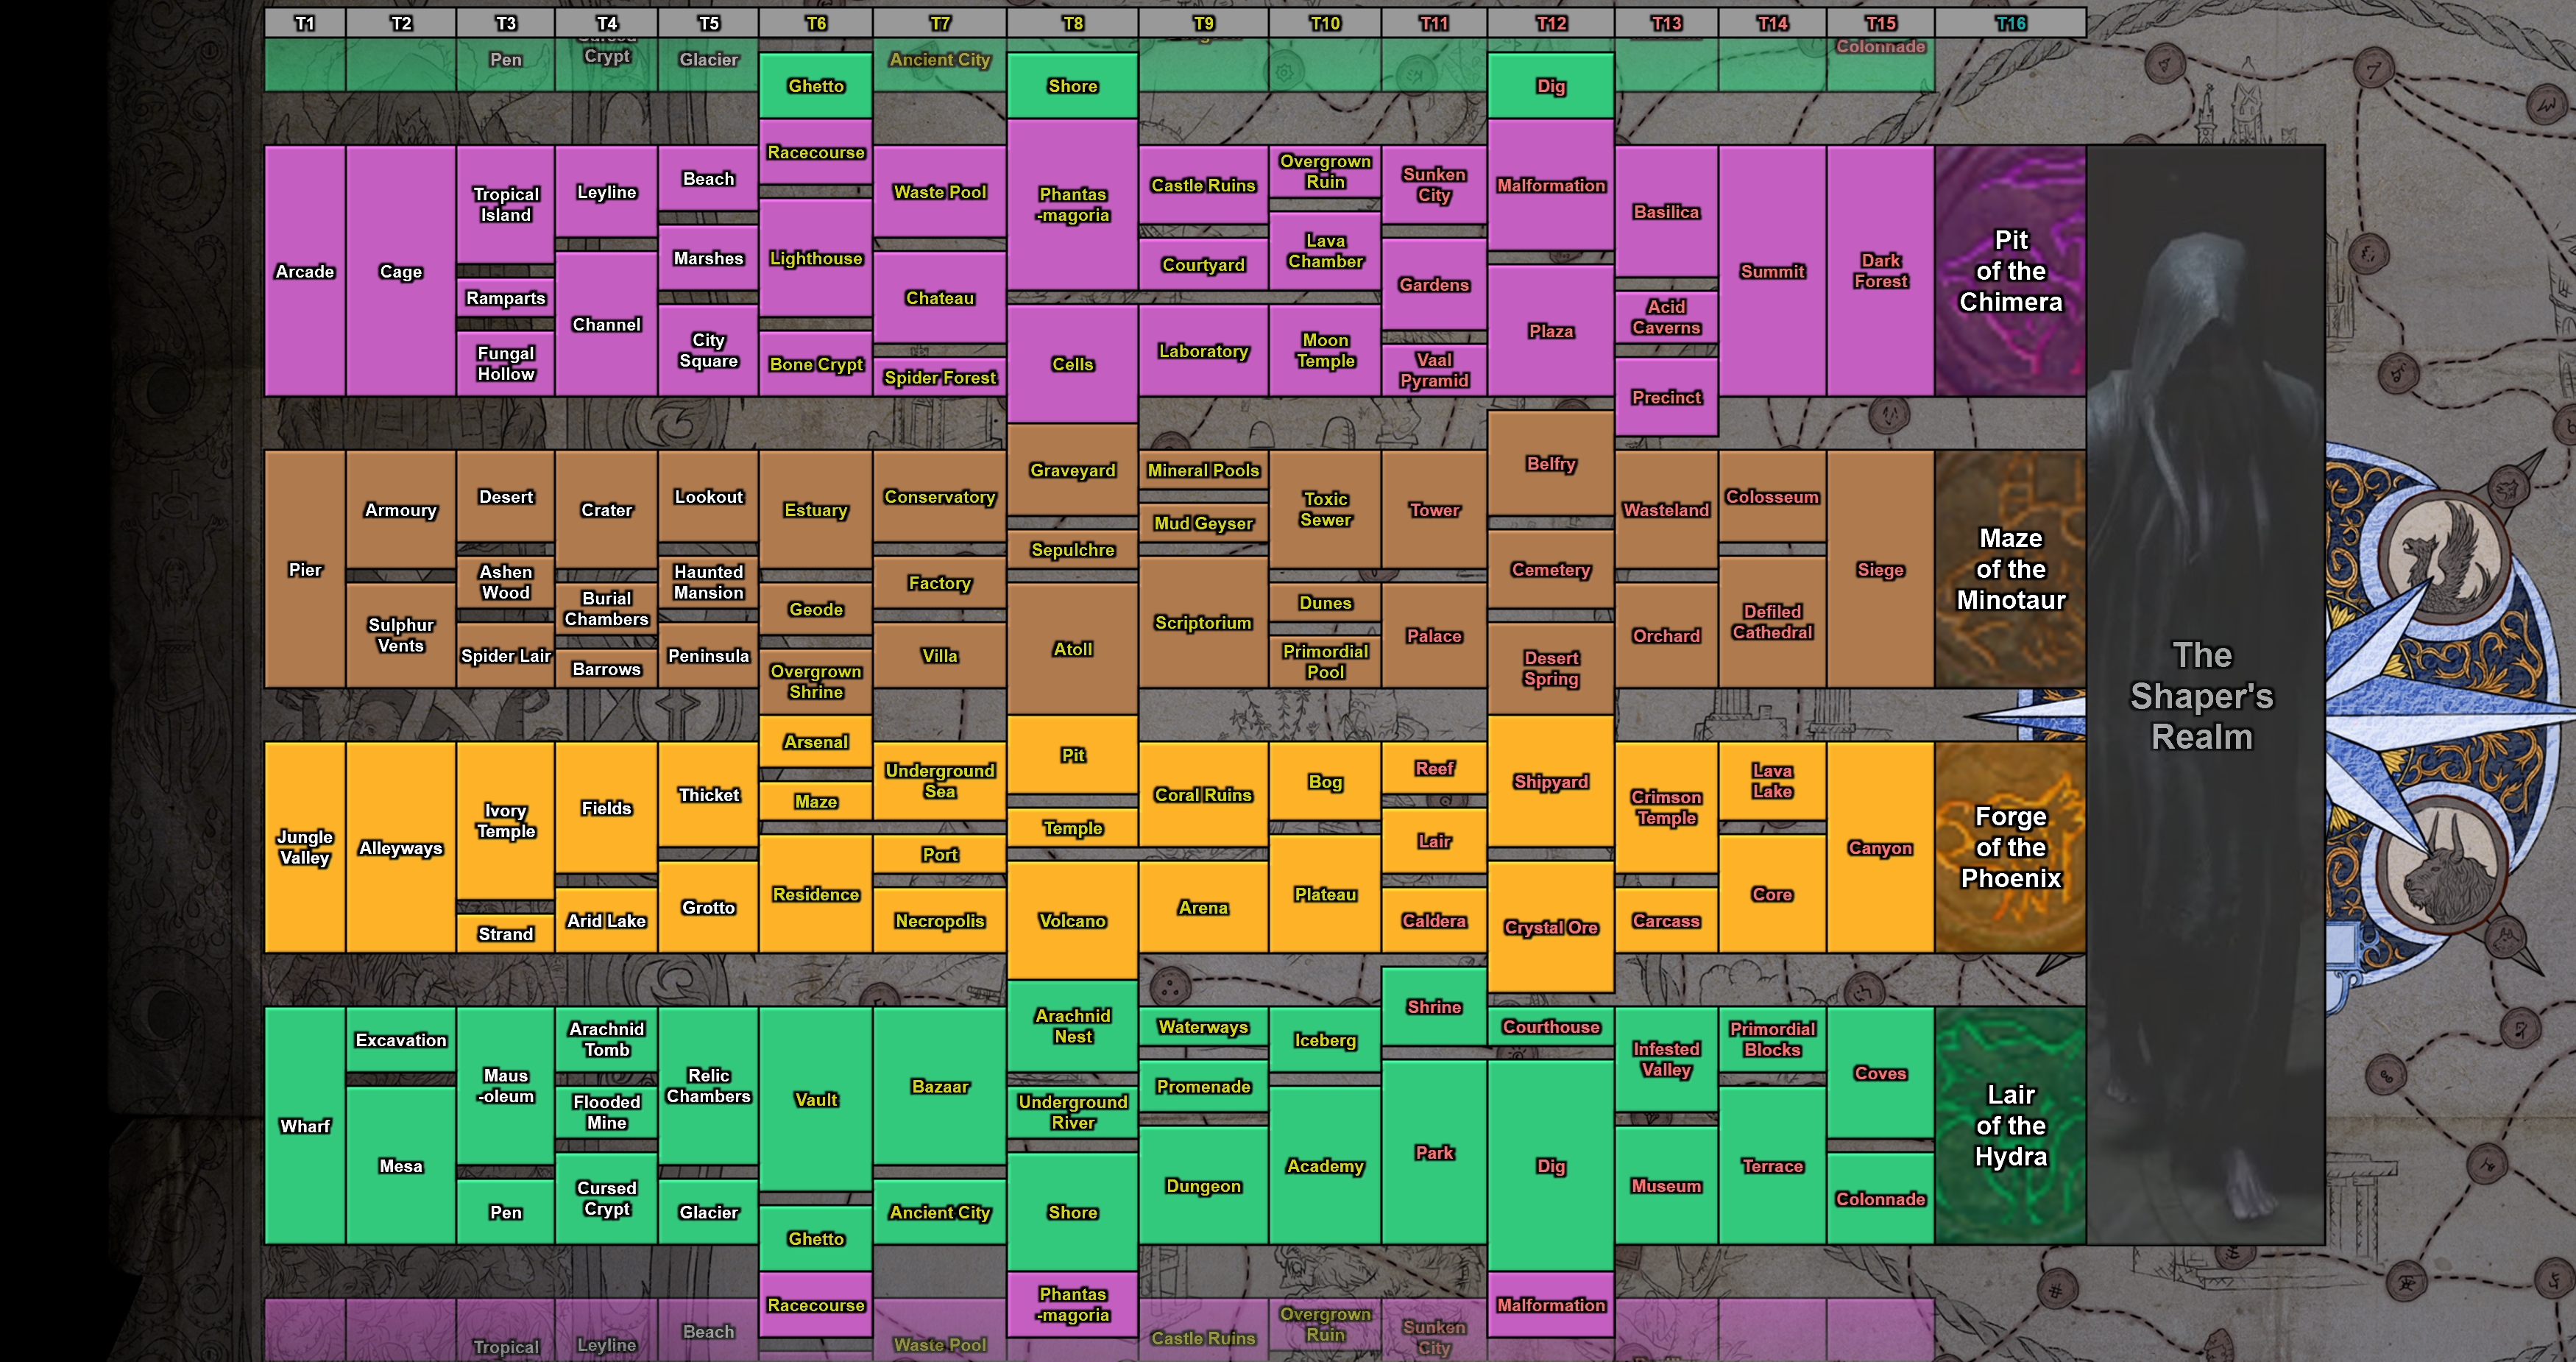
After completing your first map, Kirac will show the player the Atlas of Worlds. The Atlas of Worlds visualizes how maps are connected to each other and form pathways between each map on the Atlas. There are four starting points, starting from the center of the Atlas. Maps are also grouped within 8 regions.
After some exploration, players will encounter Zana, Master Cartographer and a portal that leads to a Citadel, where Watchstones can be placed. Watchstones are dropped by the Conquerors that rule the Atlas, who can be challenged by running maps within their influence region enough times. Once a Watchstone is socketed to a Citadel, it will empower all maps in that region, increasing their map level and adding new maps to the region.
Only connected maps and maps previously completed can drop from a map area. In addition to these rules, this map drop pool only consists of maps that are currently visible on the atlas meaning maps that are removed from changing Watchstones are also removed from the map drop pool. There are exceptions that do not take your Atlas progression into account: During Zana's Atlas Missions which gives you a choice of maps to open, unique maps that may also drop their base type, and various league content that may drop maps.
When four Watchstones are socketed to one region, it increases the Awakening Level of the Atlas. Awakening Levels increase map and influenced item drop chances and difficulty for every map on the Atlas, as well as enabling Awakened Atlas completion marks for maps at a certain level. Running maps in an awakened zone will also draw out the Awakener, the leader of the Conquerors.
Regarding map drops, there is a 2x weighting for incomplete maps, and 4x weighting for adjacent maps, multiplicative.[2]
Modifiers
Each (non-unique) map can have up to 3 prefixes and 3 suffixes, just like other items. Currency related to rarity also works the same, for example, an ![]() Orb of AlchemyOrb of AlchemyStack Size: 10Upgrades a normal item to a rare itemRight click this item then left click a normal item to apply it.
Orb of AlchemyOrb of AlchemyStack Size: 10Upgrades a normal item to a rare itemRight click this item then left click a normal item to apply it.
Shift click to unstack.![]() will turn a basic map into a rare. Modifiers for maps change the properties of the map when one is in that map, thereby making it more difficult and (usually) resulting in increased item quantity for all drops on that map. High increased quantity also affects the drop rates of maps while in a particular map, so high modifiers will increase your chances at continuing to get map drops and finding higher level maps to use. Cartographer's Sextants can affect neighbouring maps. Maps can be made considerably more difficult by using a Watchstone that increases the tier of the item.
will turn a basic map into a rare. Modifiers for maps change the properties of the map when one is in that map, thereby making it more difficult and (usually) resulting in increased item quantity for all drops on that map. High increased quantity also affects the drop rates of maps while in a particular map, so high modifiers will increase your chances at continuing to get map drops and finding higher level maps to use. Cartographer's Sextants can affect neighbouring maps. Maps can be made considerably more difficult by using a Watchstone that increases the tier of the item.
Tiers
| Map tier | Tier range | Map level range |
|---|---|---|
| Low tier maps | 1 - 5 | 68 - 72 |
| Mid tier maps | 6 - 10 | 73 - 77 |
| Top tier maps | 11 - 17 | 78 - 84 |
There are 16 tiers of maps, each tier corresponding to an area level. The lowest tier drops during progression through the game and once inside the map, higher tier maps start dropping. Magic and rare monsters can drop maps that are +1 tier above and map bosses can drop +2 tiers above the map area the character is in, respectively.
Moving from one group of map tiers to the next often imposes a challenge as the higher tier maps become harder to sustain. Furthermore, mid-tier and top-tier maps introduce higher values for the mods they can roll, new mods that are more challenging, and combinations of mods that aren't allowed to coexist on low-tier maps.
Upgrades
v3.8 Blight Map Progression
If a player has three maps of the same type, these maps may be sold to a vendor to receive one map in exchange. This newly acquired map is of a map base one tier higher in the same region. Which map you get seems to be seeded by map, and different combinations of the same map can result in a different resulting map.
Unidentified Maps
It is possible to put unidentified maps into the map device. There is a +30% quantity bonus when running these maps, but even when you enter the map the specific modifiers to the map are not revealed to you, even though the overall quantity, rarity and pack size is. Some are easy to observe, burning or chilled ground are very obvious for example, but others are harder to know immediately (if there are enough obvious modifiers, together with the quantity, rarity and pack size you might be able to determine what the mods are, though). As such, it's recommended that you have a strong character before tackling such maps; otherwise the map could have many dangerous affixes to put your character in danger. Unidentified maps can be obtained as map drops, by corrupting an identified map or by vendoring 3x magic or rare maps of the same base type.
This bonus does not apply to unidentified unique maps.[3]
Corrupted maps
Like most other items, maps can be corrupted using a ![]() Vaal OrbVaal OrbStack Size: 10Corrupts an item, modifying it unpredictablyRight click this item then left click an item to corrupt it. Corrupted items cannot be modified again.
Vaal OrbVaal OrbStack Size: 10Corrupts an item, modifying it unpredictablyRight click this item then left click an item to corrupt it. Corrupted items cannot be modified again.
Shift click to unstack.![]() . One of the following effects will occur:
. One of the following effects will occur:
- No effect (other than adding the corrupted property).
- Increase by one map tier, changing the base type to one appropriate for the new tier, and randomizing the affixes. This is the only way to create a
 Vaal Temple MapVaal Temple MapMap Level: 83
Map Tier: 16
Guild Character: >Voices. Visions. Violence. They will haunt these grounds for all of eternity.Travel to this Map by using it in a personal Map Device. Maps can only be used once.. - Reroll into a rare map with up to eight random affixes.
- Unidentify the item, retaining its affixes and quantity bonus. Unidentified magic or rare maps receive a 30% bonus quantity.
In addition to these effects, all bosses of corrupted maps have a chance to drop Sacrifice Vaal Fragments or Vaal Skill Gems.
A corrupted map can't be modified with currency in any way, but effects from Zana's map device can still be crafted on it.
Other maps
Maps can drop as a Shaper or Elder influenced map. These maps contain additional Shaper or Elder enemies and can drop Shaper or Elder influenced items. They may also have the boss replaced with one of the Guardians of the Void or Elder Guardians, which drop Shaper and Elder map fragments when defeated.
Blighted Maps can drop from blights. They contain battles and items unique to the blight league.
Zana missions have a chance to pick Maps from the Synthesis league. They contain battles and items unique to the league.
Map fragments
Map fragments are items that can be used in a map device to open portals to various high level areas with the full set in the proper alignment. Doubles or triples of the same piece will not work. Fragments can also be placed with a regular map to increase map item quantity.
Scarabs can also be used to add additional modifiers to the map, and Divine Vessels are used to capture certain boss souls to upgrade a Pantheon power.
Maps by level
| This page or section needs to be reworked to make use of Extension:Cargo instead of listing data manually. Please help improve this page if you can. |
Currently there are 158 base maps and 32 unique maps. Below is a list of all maps currently in game.
Layout ratings:
- A: The map has a consistent layout that can be reliably fully cleared with no backtracking.
- B: The map has an open layout with few obstacles, or has only short and well-connected side paths.
- C: The map has an open layout with many obstacles, or has long side paths that require backtracking.
Boss ratings:
- 5: High and consistent damage output that is difficult to avoid reliably; skipped by many players.
- 4: High and consistent damage output that can be avoided reasonably well but still very dangerous.
- 3: Occasionally high damage output that can be avoided reasonably well.
- 2: Moderate damage output that can be easily kited and/or reasonably mitigated by most builds.
- 1: Trivial for most builds.
| Map | Level | Tier | Unique | Layout Rating |
Boss Rating |
Tileset | Unique Boss | Number of Bosses |
Awakening Bonus Requirement |
|---|---|---|---|---|---|---|---|---|---|
Map Tier: 14 Guild Character: XA paradise, forever replenished by endless waves teeming with life.Travel to this Map by using it in a personal Map Device. Maps can only be used once. |
71 | 4 | ✗ |
A | 2 | The Beacon (1st half) | Glace | 1 | Awakening Level 1 Map Tier 14 |
Map Tier: 9 Guild Character: 3A penitentiary for those who are not penitent is nothing more than an inn for the evil.Travel to this Map by using it in a personal Map Device. Maps can only be used once. |
74 | 7 | ✗ |
C | 4 | The Prison | Penitentiary Incarcerator | 1 | Awakening Level 6 Map Tier 16 |
Map Tier: 3 Guild Character: NUnknown legacies. Untold stories.Travel to this Map by using it in a personal Map Device. Maps can only be used once. |
74 | 7 | ✗ |
B | 3 | The Fellshrine Ruins | Steelpoint the Avenger Champion of Frost Thunderskull |
3 | Awakening Level 2 Map Tier 14 |
Map Tier: 4 Guild Character: CA glorious vista once exclusive to emperors. Not anymore.Travel to this Map by using it in a personal Map Device. Maps can only be used once. |
69 | 2 | ✗ |
A | 3 | The Cathedral Rooftop | The Grey Plague | 1 | Awakening Level 1 Map Tier 14 |
Map Tier: 8 Guild Character: aAn unwashed gutter, where wretches cut purses and throats alike.Travel to this Map by using it in a personal Map Device. Maps can only be used once. |
69 | 2 | ✗ |
A | 3 | Oriath Square | Calderus | 1 | Awakening Level 7 Map Tier 16 |
Map Tier: 3 Guild Character: cWater vanishes; an impromptu prison becomes a tomb.Travel to this Map by using it in a personal Map Device. Maps can only be used once. |
70 | 3 | ✗ |
B | 3 | The Fetid Pool | Drought-Maddened Rhoa | 1 | Awakening Level 3 Map Tier 14 |
Map Tier: 4 Guild Character: WHeat. Dust. Wind. These are what forge strong minds and bodies.Travel to this Map by using it in a personal Map Device. Maps can only be used once. |
68 | 1 | ✗ |
C | 3 | The Dried Lake | Preethi, Eye-Pecker | 1 | Awakening Level 1 Map Tier 14 |
Map Tier: 11 Guild Character: ?In darkness, beast and man alike clamour to survive.Travel to this Map by using it in a personal Map Device. Maps can only be used once. |
70 | 3 | ✗ |
B | 2 | The Submerged Passage | The Eroding One | 1 | Awakening Level 6 Map Tier 14 |
Map Tier: 4 Guild Character: 2Embraced by mud. Grasped by roots. The careless are silently swallowed.Travel to this Map by using it in a personal Map Device. Maps can only be used once. |
72 | 5 | ✗ |
B | 3 | The Mud Flats | Tore, Towering Ancient | 1 | Awakening Level 3 Map Tier 14 |
Map Tier: 1 Guild Character: bSlaves held like cattle. A blood-soaked revolution, just waiting to happen.Travel to this Map by using it in a personal Map Device. Maps can only be used once. |
70 | 3 | ✗ |
A | 2 | The Slave Pens | Arwyn, the Houndmaster Minibosses: Lola, the Fierce Rocco, the Bloodthirsty |
1 | Awakening Level 2 Map Tier 14 |
Map Tier: 1 Guild Character: +We create so that some part of us may remain after death.Travel to this Map by using it in a personal Map Device. Maps can only be used once. |
72 | 5 | ✗ |
B | 1 | The Marketplace | Herald of Ashes Herald of Thunder |
2 | Awakening Level 5 Map Tier 16 |
Map Tier: 16 Guild Character: EVile fiends hide beneath the peaceful plains.Travel to this Map by using it in a personal Map Device. Maps can only be used once. |
72 | 5 | ✗ |
B | 2 | The Crossroads The Vaal Ruins |
Witch of the Cauldron | 1 | Awakening Level 8 Map Tier 15 |
Map Tier: 4 Guild Character: ITreat a man like a wild animal, and he will soon learn to bite.Travel to this Map by using it in a personal Map Device. Maps can only be used once. |
71 | 4 | ✗ |
A | 2 | The Slave Pens | Executioner Bloodwing | 1 | Awakening Level 8 Map Tier 16 |
Map Tier: 5 Guild Character: ÚLife crushed together. Left to crumble to dust.Travel to this Map by using it in a personal Map Device. Maps can only be used once. |
73 | 6 | ✗ |
C | 4 | The Crematorium | Megaera | 1 | Awakening Level 5 Map Tier 15 |
Map Tier: 14 Guild Character: STwo unexplored frontiers remain: The skies and the soil.Travel to this Map by using it in a personal Map Device. Maps can only be used once. |
71 | 4 | ✗ |
C | 1 | The Mines | Shrieker Eihal Breaker Toruul |
2 | Awakening Level 2 Map Tier 14 |
Map Tier: 4 Guild Character: HIcy fangs seek tender hulls to sink themselves into.Travel to this Map by using it in a personal Map Device. Maps can only be used once. |
75 | 8 | ✗ |
B | 3 | The Ascent | one random Mutewind Warband boss with a supporting Warband |
1 | Awakening Level 8 Map Tier 15 |
Map Tier: 4 Guild Character: GAmidst the barren wastes, a slender strand of life blooms.Travel to this Map by using it in a personal Map Device. Maps can only be used once. |
70 | 3 | ✗ |
B | 2 | Mirage of Bones | 1 | Awakening Level 3 Map Tier 15 | |
Map Tier: 2 Guild Character: *The farmer no longer plows or sows. Only the flattened soil remains.Travel to this Map by using it in a personal Map Device. Maps can only be used once. |
72 | 5 | ✗ |
A | 2 | The Old Fields | Titan of the Grove | 1 | Awakening Level 2 Map Tier 14 |
Map Tier: 11 Guild Character: eThe wealthy foolishly battle the ocean for domain.Travel to this Map by using it in a personal Map Device. Maps can only be used once. |
76 | 9 | ✗ |
A | 4 | The Quay | Unravelling Horror | 1 | Awakening Level 3 Map Tier 15 |
Map Tier: 11 Guild Character: dThe water brings life, the poison takes it away.Travel to this Map by using it in a personal Map Device. Maps can only be used once. |
72 | 5 | ✗ |
B | 3 | The Wetlands | Aulen Greychain | 1 | Awakening Level 7 Map Tier 14 |
| Esh's Domain | 70 | N/A | ✗ |
N/A | 5 | The Chamber of Sins | Esh, Forked Thought | 1 | N/A |
| Tul's Domain | 70 | N/A | ✗ |
N/A | 5 | The Fellshrine Ruins | Tul, Creeping Avalanche | 1 | N/A |
| Xoph's Domain | 70 | N/A | ✗ |
N/A | 5 | Kaom's Dream | Xoph, Dark Embers | 1 | N/A |
| 70 | N/A | ✗ |
B | 5 | The Ancient Pyramid | Atziri, Queen of the Vaal Q'ura Y'ara'az A'alai Vessel of the Vaal Vessel of the Vaal |
6 | N/A | |
Map Tier: 3 Guild Character: jA deep wound in the land. One that will never heal.Travel to this Map by using it in a personal Map Device. Maps can only be used once. |
79 | 12 | ✗ |
A | 5 | The Climb | Gnar, Eater of Carrion Stonebeak, Battle Fowl |
2 | Awakening Level 4 Map Tier 15 |
Map Tier: 5 Guild Character: OBeauty and brutality in such close proximity.Travel to this Map by using it in a personal Map Device. Maps can only be used once. |
75 | 8 | ✗ |
C | 4 | Labyrinth Outdoors | Hephaeus, The Hammer | 1 | Awakening Level 3 Map Tier 16 |
Map Tier: 14 Guild Character: ÖCountless generations have walked these time-worn stones.Travel to this Map by using it in a personal Map Device. Maps can only be used once. |
71 | 4 | ✗ |
B | 3 | Oriath Square | Carius, the Unnatural Pileah, Corpse Burner Pileah, Burning Corpse |
3 | Awakening Level 6 Map Tier 14 |
Map Tier: 4 Guild Character: fJustice born of love is a surrender. Justice born of law is a punishment.Travel to this Map by using it in a personal Map Device. Maps can only be used once. |
81 | 14 | ✗ |
C | 4 | The Templar Courts | Thena Moga, The Crimson Storm Ion Darkshroud, The Hungering Blade Bolt Brownfur, Earth Churner |
3 | Awakening Level 2 Map Tier 15 |
Map Tier: 3 Guild Character: UWe must all walk the narrow, winding path. The end is always the same.Travel to this Map by using it in a personal Map Device. Maps can only be used once. |
69 | 2 | ✗ |
A | 3 | The Climb | Rek'tar, the Breaker | 1 | Awakening Level 1 Map Tier 14 |
Map Tier: 2 Guild Character: hTrapped in absolute darkness. Despair. Panic. Terror.Travel to this Map by using it in a personal Map Device. Maps can only be used once. |
71 | 4 | ✗ |
C | 3 | The Den | Void Anomaly | 1 | Awakening Level 2 Map Tier 15 |
Map Tier: 5 Guild Character: FFire ignites the sky. A signal to keep away. An invitation to invade.Travel to this Map by using it in a personal Map Device. Maps can only be used once. |
76 | 9 | ✗ |
B | 3 | The Beacon | one random Redblade Warband boss with a supporting Warband |
1 | Awakening Level 4 Map Tier 14 |
Chateau MapMap Level: 78 Map Tier: 8 Guild Character: ™ Item Quantity: (+60%-+100%) Item Rarity: (+200%-+300%)(100-150)% increased Experience gain Monster Level: 78 (200-300)% more Rare Monsters (30-40)% more Monster Life (16-24)% increased Monster Damage Area contains Cadiro PerandusForget kings and emperors; He who holds the coin holds all the power.Travel to this Map by using it in the Templar Laboratory or a personal Map Device. Maps can only be used once. |
75 | 8 | ✓
|
B | The Lord's Labyrinth | Platinia, Servant of Prospero
Auriot, Prospero's Furnace Guardian Rhodion, Servant of Prospero Osmea, Servant of Prospero Pallias, Servant of Prospero Argient, Servant of Prospero Rheniot, Servant of Prospero |
7 | Awakening Level 3 Map Tier 16 | |
Map Tier: 9 Guild Character: 1Relics of a forbidden past. Hidden away. Forgotten.Travel to this Map by using it in a personal Map Device. Maps can only be used once. |
70 | 3 | ✗ |
B | 2 | The Reliquary | Litanius, the Black Prayer | 1 | Awakening Level 5 Map Tier 14 |
Map Tier: 3 Guild Character: 8Nothing good washes up on this dark shore.Travel to this Map by using it in a personal Map Device. Maps can only be used once. |
71 | 4 | ✗ |
A | 3 | The Twilight Strand | Master of the Blade Massier |
2 | Awakening Level 1 Map Tier 14 |
Strand MapMap Level: 71 Map Tier: 4 Guild Character: È Item Quantity: (+40%-+60%) Item Rarity: (+120%-+160%)Area contains many Totems Curses have 50% reduced effect on Monsters Rare Monsters each have a Nemesis ModWe all began life in darkness, we shall all end it there.Travel to this Map by using it in the Templar Laboratory or a personal Map Device. Maps can only be used once. |
71 | 4 | ✓ |
C | 4 | The Ship Graveyard | Tormented Temptress Minibosses: Shades (for each player) |
1 | Awakening Level 1 Map Tier 14 |
Map Tier: 2 Guild Character: iTremble in the might of the flames.Travel to this Map by using it in a personal Map Device. Maps can only be used once. |
77 | 10 | ✗ |
A | 4 | Kaom's Dream | Forest of Flames | 1 | Awakening Level 2 Map Tier 16 |
Map Tier: 3 Guild Character: RThis was not the first civilization to believe itself the greatest. And it will not be the last.Travel to this Map by using it in a personal Map Device. Maps can only be used once. |
73 | 6 | ✗ |
C | 4 | The Vaal City | Lady Stormflay | 1 | Awakening Level 2 Map Tier 14 |
Map Tier: 14 Guild Character: nMan burrows for only the eternal hibernation.Travel to this Map by using it in a personal Map Device. Maps can only be used once. |
69 | 2 | ✗ |
C | 3 | The Wetlands The Vaal Ruins |
Beast of the Pits | 1 | Awakening Level 7 Map Tier 15 |
Map Tier: 4 Guild Character: ZThe stone cannot stop the torrent. It can only divert it.Travel to this Map by using it in a personal Map Device. Maps can only be used once. |
71 | 4 | ✗ |
C | 4 | The Aqueduct | The Winged Death | 1 | Awakening Level 2 Map Tier 15 |
Map Tier: 11 Guild Character: 6Ornate, elaborate, ostentatious... and dripping with death.Travel to this Map by using it in a personal Map Device. Maps can only be used once. |
74 | 7 | ✗ |
C | 3 | The Bath House | The Forgotten Soldier | 1 | Awakening Level 1 Map Tier 14 |
Map Tier: 5 Guild Character: kForlorn and sorrowful, this once opulent ruin conceals the sins of a fallen line.Travel to this Map by using it in a personal Map Device. Maps can only be used once. |
68 | 1 | ✗ |
C | 2 | Barthol, the Pure Barthol, the Corrupter |
1 | Awakening Level 1 Map Tier 14 | |
Map Tier: 11 Guild Character: mMan and nature intertwined, but only for the chosen few.Travel to this Map by using it in a personal Map Device. Maps can only be used once. |
68 | 1 | ✗ |
C | 3 | The Lunaris Temple Level 1 (Act 3) The Imperial Gardens |
one random Perandus Manor boss | 1 | Awakening Level 1 Map Tier 14 |
Map Tier: 13 Guild Character: lThey live trapped forever in darkness and confusion. We are no different.Travel to this Map by using it in a personal Map Device. Maps can only be used once. |
73 | 6 | ✗ |
C | 4 | The Vaal Ruins | Shadow of the Vaal | 1 | Awakening Level 5 Map Tier 14 |
Map Tier: 9 Guild Character: MPanic only hastens the venom's passage to the heart.Travel to this Map by using it in a personal Map Device. Maps can only be used once. |
72 | 5 | ✗ |
B | 3 | The Chamber of Sins The Weaver's Chambers |
Thraxia | 1 | Awakening Level 7 Map Tier 16 |
Map Tier: 3 Guild Character: PThe creatures that prowl the wildest extremes, nature anoints with cruel efficacy to defend her.Travel to this Map by using it in a personal Map Device. Maps can only be used once. |
68 | 1 | ✗ |
C | 3 | The Boiling Lake | The Gorgon | 1 | Awakening Level 1 Map Tier 14 |
Map Tier: 3 Guild Character: ÏAffluence and effluence, separated by a few feet of soil.Travel to this Map by using it in a personal Map Device. Maps can only be used once. |
75 | 8 | ✗ |
C | 3 | The Sewers | Arachnoxia | 1 | Awakening Level 2 Map Tier 16 |
Harbinger MapMap Level: 72 Map Tier: 5 Item Quantity: (+40%-+60%) Item Rarity: (+40%-+60%)Area contains 6 extra Harbingers Corrupted Travel to this Map by using it in a personal Map Device. Maps can only be used once. |
72 | 5 | ✓ |
N/A | |||||
Map Tier: 4 Guild Character: ÆThey came for enlightenment, but were imprisoned by madness.Travel to this Map by using it in a personal Map Device. Maps can only be used once. |
77 | 10 | ✗ |
C | 4 | The Archives | The Arbiter of Knowledge | 1 | Awakening Level 2 Map Tier 14 |
Map Tier: 5 Guild Character: ÍTime turns even the vicious volcanoes to hollow shells.Travel to this Map by using it in a personal Map Device. Maps can only be used once. |
73 | 6 | ✗ |
A | 4 | The Ledge | Puruna, the Challenger | 1 | Awakening Level 3 Map Tier 14 |
Atoll MapMap Level: 73 Map Tier: 6 Guild Character: Ç Item Quantity: (+40%-+60%) Item Rarity: (+200%-+400%)Area has patches of Chilled Ground 20 patches with Ground Effect per 100 tiles (Hidden) Ground Effect has a radius of 14 (Hidden) Monsters deal 50% extra Physical Damage as Lightning Monsters are Immune to randomly chosen Elemental Ailments or Stun Monsters' Melee Attacks apply random Hexes on Hit Monsters Reflect HexesWhispers from a world apart Speak my name beyond the tomb; Bound within the Maelström's heart, Will they grant me strength or doom?Travel to this Map by using it in the Templar Laboratory or a personal Map Device. Maps can only be used once. |
73 | 6 | ✓ |
A | 3 | The Ledge | Merveil, the Reflection Merveil, the Returned Minibosses: Heir of Flame Heir of Storm |
1 | Awakening Level 3 Map Tier 14 |
Map Tier: 3 Guild Character: KDesperately reaching skyward and digging downwards. Sustenance is an eternal struggle.Travel to this Map by using it in a personal Map Device. Maps can only be used once. |
70 | 3 | ✗ |
B | 2 | The Ashen Fields | Lord of the Ashen Arrow | 1 | Awakening Level 1 Map Tier 14 |
Map Tier: 3 Guild Character: LA stone forest of forgotten names.Travel to this Map by using it in a personal Map Device. Maps can only be used once. |
79 | 12 | ✗ |
B | 5 | The Fellshrine Ruins | Erebix, Light's Bane | 1 | Awakening Level 2 Map Tier 14 |
Cemetery MapMap Level: (73-79) Map Tier: 12 Guild Character: Ð Item Quantity: +100% Item Rarity: +100%Monster Level: (73-79) Unique Boss drops 3 additional Maps Unique Boss gives 2000% increased Experience 0.5 Flask Charges recovered every 3 secondsSome dead have long envied the living. When given the chance, they take from us what they can. So we offer our suffrage. In return, they give only suffering.Travel to this Map by using it in the Templar Laboratory or a personal Map Device. Maps can only be used once. |
79 | 12 | ✓ |
B | 4 | The Crypt | Maker of Mires Minibosses: Jaesyn Jik'shah Balah, Duke Kruug, the Frayed |
1 | Awakening Level 2 Map Tier 14 |
Map Tier: 2 Guild Character: ÑThey pleaded for the gods to bless their land. Now they lie under the soil.Travel to this Map by using it in a personal Map Device. Maps can only be used once. |
71 | 4 | ✗ |
C | 2 | The Imperial Fields | Drek, Apex Hunter Minibosses: Enthralled Dire Wolf Enraptured Hellion |
1 | Awakening Level 1 Map Tier 14 |
Map Tier: 1 Guild Character: 5Verdant canopies shroud the world in darkness.Travel to this Map by using it in a personal Map Device. Maps can only be used once. |
72 | 5 | ✗ |
A | 2 | The Riverways | Queen of the Great Tangle | 1 | Awakening Level 1 Map Tier 14 |
Map Tier: 9 Guild Character: [A vault for the dead, as if they were valuable. Pathetic.Travel to this Map by using it in a personal Map Device. Maps can only be used once. |
70 | 3 | ✗ |
B | 2 | The Ossuary (Act 10) | Tolman, the Exhumer | 1 | Awakening Level 1 Map Tier 14 |
Map Tier: 10 Guild Character: oEvery movement is watched, recorded, remembered.Travel to this Map by using it in a personal Map Device. Maps can only be used once. |
73 | 6 | ✗ |
A | 2 | The Belly of the Beast Level 1 | Erythrophagia | 1 | Awakening Level 7 Map Tier 16 |
Map Tier: 14 Guild Character: BLittle light enters. No life escapes.Travel to this Map by using it in a personal Map Device. Maps can only be used once. |
69 | 2 | ✗ |
B | 3 | The Dread Thicket | The Primal One | 1 | Awakening Level 7 Map Tier 16 |
Map Tier: 2 Guild Character: qSilent stillness. The waters are as cold as they are black.Travel to this Map by using it in a personal Map Device. Maps can only be used once. |
76 | 9 | ✗ |
C | 2 | Merveil's Caverns | Merveil, the Reflection | 1 | Awakening Level 1 Map Tier 14 |
Underground Sea MapMap Level: 69 Map Tier: 2 Item Quantity: +40%Area has patches of desecrated ground 20 patches with Ground Effect per 100 tiles (Hidden) Ground Effect has a radius of 10 (Hidden) (40-50)% more Monster Life (30-40)% increased Monster Damage Area becomes fatal after some time"Here the soil is more deadly than any swing of the axe." - Oba of the Karui, Conqueror of Corruption.Travel to this Map by using it in a personal Map Device. Maps can only be used once. |
76 | 9 | ✓ |
B | 1 | The Submerged Passage The Crypt The Chamber of Sins |
(none) | 0 | Awakening Level 1 Map Tier 14 |
Map Tier: 2 Guild Character: ËReach out into the abyss, and the abyss reaches back.Travel to this Map by using it in a personal Map Device. Maps can only be used once. |
70 | 3 | ✗ |
A | 2 | The Docks | Stone of the Currents | 1 | Awakening Level 3 Map Tier 14 |
Map Tier: 16 Guild Character: ÓMan is not the only beast to bend nature to its will.Travel to this Map by using it in a personal Map Device. Maps can only be used once. |
76 | 9 | ✗ |
B | 5 | The Weaver's Chambers | Spinner of False Hope | 1 | Awakening Level 6 Map Tier 14 |
Map Tier: 15 Guild Character: YGreed is the only god here.Travel to this Map by using it in a personal Map Device. Maps can only be used once. |
77 | 10 | ✗ |
B | 3 | The Marketplace | Ancient Sculptor Minibosses: Marceus the Defaced The Goddess of Purity |
1 | Awakening Level 2 Map Tier 15 |
Map Tier: 4 Guild Character: VThe dead ask to be remembered, but such requests are seldom met.Travel to this Map by using it in a personal Map Device. Maps can only be used once. |
75 | 8 | ✗ |
C | 2 | The Catacombs | Xixic, High Necromancer | 1 | Awakening Level 2 Map Tier 15 |
Bone Crypt MapMap Level: 75 Map Tier: 8 Guild Character: $ Item Quantity: (+120%-+200%)(40-50)% more Monster Life (30-40)% increased Monster Damage Final Boss drops higher Level ItemsThey flew, and leapt, and clambered over, They crawled, and swam, and slithered under. Still its ancient secrets await unclaimed And of this hidden temple, only legends remain.Travel to this Map by using it in the Templar Laboratory or a personal Map Device. Maps can only be used once. |
75 | 8 | ✓ |
A | 4 | The Catacombs | Olmec, the All Stone Minibosses: Achioc, the Glacier Zorioc, the Storm Levioc, the Volcano Izioc, the Abyss |
1 | Awakening Level 2 Map Tier 15 |
Map Tier: 12 Guild Character: ÁThrust above the waves, still teeming with horrors from the depths.Travel to this Map by using it in a personal Map Device. Maps can only be used once. |
77 | 10 | ✗ |
C | 4 | Captain Tanner Lightfoot | 1 | Awakening Level 1 Map Tier 14 | |
Map Tier: 4 Guild Character: AShifting, morphing, expanding. A reminder of the virtues of an agile mind.Travel to this Map by using it in a personal Map Device. Maps can only be used once. |
75 | 8 | ✗ |
B | 3 | The Vastiri Desert | The Blacksmith | 1 | Awakening Level 2 Map Tier 14 |
Dunes MapMap Level: 75 Map Tier: 8 Guild Character: › Item Quantity: (+100%-+150%) Item Rarity: (+200%-+300%)(60-100)% increased Experience gain Area contains unbridged gaps to cross Monsters have 50% chance to Avoid Ailments (20-25)% increased Monster Movement Speed (20-25)% increased Monster Attack Speed (20-25)% increased Monster Cast Speed Players have 200% increased Cooldown Recovery Rate for Movement SkillsMan creates where nature cannot.Travel to this Map by using it in the Templar Laboratory or a personal Map Device. Maps can only be used once. |
75 | 8 | ✓ |
C | 3 | The Vastiri Desert | Talin, Faithbreaker | 1 | Awakening Level 2 Map Tier 16 |
Map Tier: 2 Guild Character: JVibrant colours dash across the grey, consuming Man's work.Travel to this Map by using it in a personal Map Device. Maps can only be used once. |
78 | 11 | ✗ |
C | 2 | The Imperial Gardens | Sallazzang | 1 | Awakening Level 2 Map Tier 15 |
Map Tier: 3 Guild Character: QFiend and fortune-hunter alike turned to ash. A sorry alliance of unending agony.Travel to this Map by using it in a personal Map Device. Maps can only be used once. |
77 | 10 | ✗ |
B | 3 | The Crematorium | Fire and Fury | 1 | Awakening Level 2 Map Tier 16 |
Map Tier: 4 Guild Character: ÜA wall is the surest sign for raiders that there is something of value to take.Travel to this Map by using it in a personal Map Device. Maps can only be used once. |
72 | 5 | ✗ |
A | 3 | The Sarn Ramparts | Legius Garhall | 1 | Awakening Level 2 Map Tier 15 |
Map Tier: 14 Guild Character: THome only to misery now.Travel to this Map by using it in a personal Map Device. Maps can only be used once. |
74 | 7 | ✗ |
B | 5 | The Sceptre of God | Excellis Aurafix | 1 | Awakening Level 7 Map Tier 14 |
Map Tier: 2 Guild Character: 9Life, like still water, becomes trapped. Stagnant. Foul.Travel to this Map by using it in a personal Map Device. Maps can only be used once. |
76 | 9 | ✗ |
A | 3 | The Caverns | It That Fell | 1 | Awakening Level 7 Map Tier 16 |
Underground River MapMap Level: 69 Map Tier: 2 Guild Character: æ Item Quantity: +150% Item Rarity: +150%Unique Boss drops 4 additional Maps (20-50)% more Magic Monsters (20-50)% more Rare Monsters 25% more Monster Life 30% increased Monster DamageHowls and laughter They hide in the day They smell you, they watch you They track their new preyTravel to this Map by using it in a personal Map Device. Maps can only be used once. |
76 | 9 | ✓ |
B | 4 | The Caverns | Solus, Pack Alpha Storm Eye Winterfang |
3 | Awakening Level 7 Map Tier 16 |
Map Tier: 5 Guild Character: rThere is no war. There is no army. Only fear lingers.Travel to this Map by using it in a personal Map Device. Maps can only be used once. |
69 | 2 | ✗ |
B | 2 | Labyrinth Indoors | Warmonger | 1 | Awakening Level 6 Map Tier 16 |
Map Tier: 3 Guild Character: 4An elaborate, beautiful garden, hidden from the public. Selfish.Travel to this Map by using it in a personal Map Device. Maps can only be used once. |
73 | 6 | ✗ |
B | 4 | The Imperial Gardens | Oriath's Vengeance Oriath's Vigil Oriath's Virtue |
3 | Awakening Level 2 Map Tier 15 |
Courtyard MapMap Level: 70 Map Tier: 3 Guild Character: ² Item Quantity: (+100%-+150%) Item Rarity: (+100%-+150%) Monster Pack Size: (+30%-+50%)20% more Monster Life Monsters cannot be Shocked 20% increased Monster Damage +35% Monster Lightning Resistance Monsters deal 35% extra Physical Damage as LightningTo the east, it cannot be seen. To the west, it cannot be touched. To the south, it cannot be remembered. And to the north, it cannot be contained.Travel to this Map by using it in a personal Map Device. Maps can only be used once. |
73 | 6 | ✓ |
C | 3 | The Battlefront | Avatar of Thunder Minibosses: Guardian of the North Guardian of the East Guardian of the South Guardian of the West |
1 | Awakening Level 2 Map Tier 15 |
Map Tier: 3 Guild Character: "Many hands may move a mountain.Travel to this Map by using it in a personal Map Device. Maps can only be used once. |
77 | 10 | ✗ |
C | 3 | The Quarry | Avatar of Undoing | 1 | Awakening Level 7 Map Tier 15 |
Map Tier: 2 Guild Character: ŒShould we feel disgusted at how the weak predate the strong, or should we feel... admiration?Travel to this Map by using it in a personal Map Device. Maps can only be used once. |
78 | 11 | ✗ |
B | 4 | The Wetlands (Act 6) | Gorulis, Will-Thief | 1 | Awakening Level 2 Map Tier 14 |
Map Tier: 3 Guild Character: ÄMy last waking moments looked very much like this place... I miss it. I miss her.Travel to this Map by using it in a personal Map Device. Maps can only be used once. |
74 | 7 | ✗ |
B | 3 | The Reliquary | Riftwalker | 1 | Awakening Level 7 Map Tier 14 |
Map Tier: 9 Guild Character: {God's jar of raw materials. Life lying dormant, waiting to sprout.Travel to this Map by using it in a personal Map Device. Maps can only be used once. |
76 | 9 | ✗ |
A | 3 | Merveil's Caverns | Merveil, the Reflection Merveil, the Returned Minibosses: Heir of Flame Heir of Storm |
1 | Awakening Level 5 Map Tier 14 |
Map Tier: 3 Guild Character: ÉFilth springs forth like blood from a severed jugular.Travel to this Map by using it in a personal Map Device. Maps can only be used once. |
73 | 6 | ✗ |
B | 5 | The Fetid Pool | Tunneltrap | 1 | Awakening Level 2 Map Tier 14 |
Map Tier: 3 Guild Character: ]Only fear remains unforgotten, where once magnificent rites drew important crowds.Travel to this Map by using it in a personal Map Device. Maps can only be used once. |
73 | 6 | ✗ |
C | The Chamber of Sins | Visceris Minibosses: Akaveesh M'uneh |
1 | Awakening Level 8 Map Tier 15 | |
Map Tier: 3 Guild Character: /Each life, each act, as fleeting as footprints in the sand.Travel to this Map by using it in a personal Map Device. Maps can only be used once. |
76 | 9 | ✗ |
B | 3 | The Coast | Belcer, the Pirate Lord | 1 | Awakening Level 2 Map Tier 15 |
Shore MapMap Level: 76 Map Tier: 9 Guild Character: À Item Quantity: (+100%-+120%)(60-100)% increased Experience gain Monsters deal (175-190)% extra Physical Damage as Lightning Monsters gain an Endurance Charge on Hit Monsters gain a Power Charge on HitThe Treasures of the Tides wait in agony at the End of the World.Travel to this Map by using it in the Templar Laboratory or a personal Map Device. Maps can only be used once. |
76 | 9 | ✓ |
C | 4 | The Tidal Island | Fairgraves, Never Dying | 1 | Awakening Level 2 Map Tier 15 |
| 75 | N/A | ✗ |
A | 5 | The Ancient Pyramid | Eber, the Plaguemaw Inya, the Unbearable Whispers Volkuur, the Unbreathing Queen Yriel, the Feral Lord |
4 | N/A | |
Map Tier: 2 Guild Character: ÛThe temptations of paradise draw forth the good and the bad alike.Travel to this Map by using it in a personal Map Device. Maps can only be used once. |
72 | 5 | ✗ |
A | 2 | The Southern Forest | Blood Progenitor Minibosses: Spirit of Aidan Spirit of Nadia |
1 | Awakening Level 1 Map Tier 14 |
| Uul-Netol's Domain | 75 | N/A | ✗ |
N/A | 5 | The Library | Uul-Netol, Unburdened Flesh | 1 | N/A |
Tropical Island MapMap Level: 69 Map Tier: 2(300-400)% increased Experience gain Area has increased monster variety Area is inhabited by wild Animals Monsters drop no itemsFor this beauty, beauty without strength, chokes out life.Travel to this Map by using it in a personal Map Device. Maps can only be used once. |
75 | 8 | ✓ |
B | 2 | The Southern Forest | Clutch Queen Colossal Spitter Elder Devourer Great Maw Prime Ape The First Rhoa |
6 | N/A |
Map Tier: 3 Guild Character: ~A good slave is driven by only two thoughts: service and sacrifice.Travel to this Map by using it in a personal Map Device. Maps can only be used once. |
79 | 12 | ✗ |
C | 5 | The Ancient Pyramid | The Fallen Queen The Hollow Lady The Broken Prince |
3 | Awakening Level 2 Map Tier 14 |
Vaal Pyramid MapMap Level: 79 Map Tier: 12 Guild Character: gChests have (2500-3500)% increased Item Rarity Area contains no monsters Chest drop scaling is disabled. (Hidden) Found Items have a (20-40)% chance to drop Corrupted in Area"Should I depart this mortal coil, so shall all of my treasures." - Atziri, Queen of the VaalTravel to this Map by using it in the Templar Laboratory or a personal Map Device. Maps can only be used once. |
79 | 12 | ✓ |
A | 0 | The Vaal Ruins | (none) | 0 | Awakening Level 2 Map Tier 14 |
Map Tier: 2 Guild Character: tThe sound of a thousand calls for blood echo for eternity.Travel to this Map by using it in a personal Map Device. Maps can only be used once. |
74 | 7 | ✗ |
B | 4 | The Grand Arena | Avatar of the Forge Avatar of the Huntress Avatar of the Skies |
3 | Awakening Level 2 Map Tier 16 |
Map Tier: 15 Guild Character: sWhere land springs from water, life will shortly follow.Travel to this Map by using it in a personal Map Device. Maps can only be used once. |
75 | 8 | ✗ |
B | 1 | Sumter the Twisted Minibosses: Flarus Frosis |
1 | Awakening Level 7 Map Tier 16 | |
Map Tier: 2 Guild Character: =Night's promises are dark, for even the stars must be harvested.Travel to this Map by using it in a personal Map Device. Maps can only be used once. |
76 | 9 | ✗ |
C | 4 | The Lunaris Temple (Act 8) | Sebbert, Crescent's Point | 1 | Awakening Level 2 Map Tier 14 |
Moon Temple MapMap Level: 69 Map Tier: 2 Guild Character: ^ Item Quantity: (+75%-+100%) Item Rarity: (+125%-+175%) Monster Pack Size: (+25%-+50%)Area has increased monster variety Players are Cursed with Flammability, with 60% increased Effect Players are Cursed with Frostbite, with 60% increased Effect Area is inhabited by Lunaris fanatics Area is inhabited by Solaris fanaticsIn the shadow of war, all are eclipsed.Travel to this Map by using it in a personal Map Device. Maps can only be used once. |
76 | 9 | ✓ |
The Lunaris Temple (Act 8) The Solaris Temple |
Helial, the Day Unending Selenia, the Endless Night Minibosses: Opid, Helial's Herald Arteth, Selenia's Herald Aloris, the First Light Nebria, the Last Light |
1 | Awakening Level 2 Map Tier 14 | ||
Map Tier: 4 Guild Character: (Ancient artifacts and beautiful baubles. All paid for in blood.Travel to this Map by using it in a personal Map Device. Maps can only be used once. |
78 | 11 | ✗ |
C | 5 | The Library | He of Many Pieces | 1 | Awakening Level 2 Map Tier 14 |
Museum MapMap Level: 78 Map Tier: 11 Guild Character: Õ Item Quantity: +90% Item Rarity: +45%Players are Cursed with Vulnerability, with 60% increased Effect Players are Cursed with Conductivity, with 60% increased Effect Players are Cursed with Flammability, with 60% increased Effect Players are Cursed with Frostbite, with 60% increased Effect Players are Cursed with Despair, with 60% increased Effect Unique Boss drops divination cardsPlease take out your blades, your whips, and your spikes. Class is now in session.Travel to this Map by using it in the Templar Laboratory or a personal Map Device. Maps can only be used once. |
78 | 11 | ✓ |
C | 4 | The Library | Headmistress Braeta | 1 | Awakening Level 2 Map Tier 14 |
Map Tier: 13Steep cliffs divide where the trees may grow, and where they may not.Travel to this Map by using it in a personal Map Device. Maps can only be used once. |
77 | 10 | ✗ |
A | 3 | The Ridge | Puruna, the Challenger Poporo, the Highest Spire |
2 | Awakening Level 2 Map Tier 14 |
Map Tier: 10 Guild Character: ‡Knowledge balanced atop a vast pit. Hold on, or perish in the darkness of ignorance.Travel to this Map by using it in a personal Map Device. Maps can only be used once. |
75 | 8 | ✗ |
A | 4 | The Library The Crypt |
Gisale, Thought Thief | 1 | Awakening Level 3 Map Tier 14 |
Map Tier: 14 Guild Character: ŸLives come and go. Only bones and dust remain.Travel to this Map by using it in a personal Map Device. Maps can only be used once. |
77 | 10 | ✗ |
The Ossuary (Act 5) The Rotting Core (Doedre's Despair) |
Doedre the Defiler | 1 | Awakening Level 3 Map Tier 15 | ||
Map Tier: 3 Guild Character: -Immaculate white stone rises from the abyss. Perfection.Travel to this Map by using it in a personal Map Device. Maps can only be used once. |
77 | 10 | ✗ |
C | 3 | The Solaris Temple | Jorus, Sky's Edge | 1 | Awakening Level 2 Map Tier 14 |
Temple MapMap Level: 77 Map Tier: 10 Guild Character: ß Item Quantity: +100% Item Rarity: +250%150% increased Experience gain (140-160)% more Monster Life (140-160)% increased Monster Damage 25% increased Monster Movement Speed 25% increased Monster Attack Speed 25% increased Monster Cast Speed Area is a large Maze Unique Boss drops (10-15) additional Rare (Life Flasks-Boots)Laughs of all the twisted Echo through these halls of gold. In this cold forgotten void They wander, forever uncontrolled.Travel to this Map by using it in the Templar Laboratory or a personal Map Device. Maps can only be used once. |
77 | 10 | ✓ |
B | 5 | The Lunaris Temple Level 2 (Act 3) | Mistress Hyseria | 1 | Awakening Level 2 Map Tier 14 |
Map Tier: 2 Guild Character: 0We ascend to great heights to commit low acts.Travel to this Map by using it in a personal Map Device. Maps can only be used once. |
80 | 13 | ✗ |
B | 4 | Shavronne's Tower | Liantra Bazur |
2 | Awakening Level 8 Map Tier 15 |
Map Tier: 15 Guild Character: )Wealth beyond imagining, locked beyond reach.Travel to this Map by using it in a personal Map Device. Maps can only be used once. |
74 | 7 | ✗ |
B | 4 | Labyrinth Indoors | Guardian of the Vault | 1 | Awakening Level 2 Map Tier 14 |
Map Tier: 5 Guild Character: _Verdant life blossoms amidst death.Travel to this Map by using it in a personal Map Device. Maps can only be used once. |
73 | 6 | ✗ |
C | 3 | The Sewers | Portentia, the Foul | 1 | Awakening Level 2 Map Tier 15 |
Map Tier: 15 Guild Character: !They feel your every move, your every breath, with a million little wires.Travel to this Map by using it in a personal Map Device. Maps can only be used once. |
70 | 3 | ✗ |
A | 2 | The Temple of Decay | Hybrid Widow | 1 | Awakening Level 2 Map Tier 15 |
Map Tier: 3 Guild Character: wBells are rung in celebration, and in sorrow. And, finally, in despair.Travel to this Map by using it in a personal Map Device. Maps can only be used once. |
80 | 13 | ✗ |
A | 5 | The Cathedral Rooftop | Lord of the Grey | 1 | Awakening Level 3 Map Tier 16 |
Map Tier: 15 Guild Character: yLayer upon layer of death and rot. Disgusting.Travel to this Map by using it in a personal Map Device. Maps can only be used once. |
77 | 10 | ✗ |
B | 3 | The Fetid Pool | Skullbeak | 1 | Awakening Level 2 Map Tier 14 |
Map Tier: 13 Guild Character: }Saints and heathens look the same once the rot takes hold.Travel to this Map by using it in a personal Map Device. Maps can only be used once. |
71 | 4 | ✗ |
C | 3 | The Crypt | Pagan Bishop of Agony | 1 | Awakening Level 1 Map Tier 14 |
Cursed Crypt MapMap Level: 80 Map Tier: 13 Guild Character: ÅContains waves of Monsters Contains additional waves of Undead Monsters <0 to 7 random additional waves modifiers>For his sins he was hunted in his sleep, judgement wrought of twisted nightmare. The Coward bound his dreams to stone, awaiting another to walk the path of true atonement.Travel to this Map by using it in a personal Map Device. Maps can only be used once. |
71 | 4 | ✓ |
A | 2 | The Crypt | Infector of Dreams | 1 | Awakening Level 1 Map Tier 14 |
Map Tier: 3 Guild Character: <The fruit that grows from bloody ground tastes sweetest.Travel to this Map by using it in a personal Map Device. Maps can only be used once. |
81 | 14 | ✗ |
C | 4 | The Imperial Gardens | Vision of Justice | 1 | Awakening Level 2 Map Tier 15 |
Map Tier: 3 Guild Character: zMan's reach extends into the ocean, clawing at its infinite depths.Travel to this Map by using it in a personal Map Device. Maps can only be used once. |
70 | 3 | ✗ |
C | 2 | The Docks | Ancient Architect | 1 | Awakening Level 1 Map Tier 14 |
Map Tier: 4 Guild Character: :Crushed together and fenced in, to live out their lives like cattle.Travel to this Map by using it in a personal Map Device. Maps can only be used once. |
78 | 11 | ✗ |
B | 4 | The Slums | three random Rogue Exiles | 3 | Awakening Level 5 Map Tier 15 |
Map Tier: 12 Guild Character: vThe stone and lumber sleeps. The captains are long dead. Only the sea knows their end.Travel to this Map by using it in a personal Map Device. Maps can only be used once. |
79 | 12 | ✗ |
B | The Docks | one random Brinerot Warband boss with a supporting Warband |
1 | Awakening Level 5 Map Tier 16 | |
Map Tier: 12 Guild Character: uNo rest, no peace, no negotiation. Only War.Travel to this Map by using it in a personal Map Device. Maps can only be used once. |
78 | 11 | ✗ |
A | 4 | The Ruined Square | Tahsin, Warmaker | 1 | Awakening Level 7 Map Tier 16 |
Harbinger MapMap Level: 77 Map Tier: 10 Item Quantity: (+40%-+60%) Item Rarity: (+40%-+60%)Area contains 6 extra Harbingers Corrupted Travel to this Map by using it in the Templar Laboratory or a personal Map Device. Maps can only be used once. |
77 | 10 | ✓ |
N/A | |||||
Map Tier: 4 Guild Character: xA white bone stripped of its fertile flesh. Life spirals towards its end.Travel to this Map by using it in a personal Map Device. Maps can only be used once. |
81 | 14 | ✗ |
C | 4 | The Dried Lake | The Brittle Emperor | 1 | Awakening Level 1 Map Tier 14 |
Map Tier: 15 Guild Character: .Small minds demand the largest structures.Travel to this Map by using it in a personal Map Device. Maps can only be used once. |
78 | 11 | ✗ |
A | 3 | The Battlefront | Tyrant | 1 | Awakening Level 1 Map Tier 14 |
Map Tier: 1 Guild Character: ÊThe dark seas swallow the careless and spit them against sharp rocks.Travel to this Map by using it in a personal Map Device. Maps can only be used once. |
80 | 13 | ✗ |
B | 4 | The Ship Graveyard | Telvar, the Inebriated Pirate Treasure |
2 | Awakening Level 1 Map Tier 14 |
Map Tier: 3 Guild Character: ÎRepetition. Convention. Duplication. Creation distilled to perfection.Travel to this Map by using it in a personal Map Device. Maps can only be used once. |
75 | 8 | ✗ |
C | 1 | The Refinery | Pesquin, the Mad Baron | 1 | Awakening Level 5 Map Tier 14 |
Map Tier: 14 Guild Character: ÒBarren and sun-bleached. Emptiness as far as the eye can reach.Travel to this Map by using it in a personal Map Device. Maps can only be used once. |
72 | 5 | ✗ |
A | 2 | The Ledge | Oak the Mighty | 1 | Awakening Level 2 Map Tier 14 |
Map Tier: 2 Guild Character: ,In darkness, the alpha rises. The companionship of beasts is fragile indeed.Travel to this Map by using it in a personal Map Device. Maps can only be used once. |
78 | 11 | ✗ |
B | 5 | The Caverns | Lycius, Midnight's Howl | 1 | Awakening Level 2 Map Tier 14 |
Map Tier: 16 Guild Character: ×Blood turns the soil to mud.Travel to this Map by using it in a personal Map Device. Maps can only be used once. |
75 | 8 | ✗ |
C | 3 | Daresso's Dream | Olof, Son of the Headsman | 1 | Awakening Level 5 Map Tier 14 |
Map Tier: 4 Guild Character: ÂA dough of bad blood. A yeast of ill will.Travel to this Map by using it in a personal Map Device. Maps can only be used once. |
73 | 6 | ✗ |
A | 3 | Maligaro's Sanctum | Nightmare's Omen | 1 | Awakening Level 2 Map Tier 14 |
Map Tier: 2 Guild Character: ;Even the greatest achievements will eventually be abandoned.Travel to this Map by using it in a personal Map Device. Maps can only be used once. |
73 | 6 | ✗ |
A | 3 | The Grand Promenade | Blackguard Avenger Blackguard Tempest |
2 | Awakening Level 8 Map Tier 16 |
Promenade MapMap Level: 69 Map Tier: 2 Guild Character: ÙContains the Immortalised Grandmasters PvP damage scaling in effectThe grandest and greatest ever to fight, Divine the champions stand tall. But match their power, best their might, And even the immortal may fall.Travel to this Map by using it in a personal Map Device. Maps can only be used once. |
73 | 6 | ✓ |
A | 5 | The Grand Promenade | (none)* | 0 | Awakening Level 8 Map Tier 16 |
Map Tier: 2 Guild Character: ÃEach branch, each leaf, an extension of a web that spans sanity.Travel to this Map by using it in a personal Map Device. Maps can only be used once. |
74 | 7 | ✗ |
C | 2 | The Northern Forest | Enticer of Rot Miniboss: Avatar of Rot |
1 | Awakening Level 6 Map Tier 14 |
Map Tier: 7 Guild Character: ÌA river in the sky, far from that which so desperately needs it.Travel to this Map by using it in a personal Map Device. Maps can only be used once. |
74 | 7 | ✗ |
C | 3 | The Aqueduct | Fragment of Winter | 1 | Awakening Level 1 Map Tier 14 |
Map Tier: 15 Guild Character: êWhen the castle falls, it has failed its only purpose.Travel to this Map by using it in a personal Map Device. Maps can only be used once. |
76 | 9 | ✗ |
B | 2 | The Broken Bridge | Leif, the Swift-Handed | 1 | Awakening Level 3 Map Tier 15 |
Map Tier: 4 Guild Character: åAs the torch flickers, brilliance emerges in boundless variance.Travel to this Map by using it in a personal Map Device. Maps can only be used once. |
81 | 14 | ✗ |
B | 5 | The Crystal Veins | Champion of the Hollows Lord of the Hollows Messenger of the Hollows |
3 | Awakening Level 2 Map Tier 14 |
Map Tier: 2 Guild Character: úCrafted with reverence. Defiled with ease.Travel to this Map by using it in a personal Map Device. Maps can only be used once. |
80 | 13 | ✗ |
A | 1 | The Desecrated Chambers | Woad, Mockery of Man | 1 | Awakening Level 2 Map Tier 14 |
Map Tier: 16 Guild Character: °Even in death, we long to be close to one another.Travel to this Map by using it in a personal Map Device. Maps can only be used once. |
75 | 8 | ✗ |
C | 3 | The Crypt | Burtok, Conjuror of Bones | 1 | Awakening Level 8 Map Tier 15 |
Necropolis MapMap Level: 83 Map Tier: 16 Guild Character: ¿ Item Quantity: +150%Unique Boss deals (30-35)% increased Damage Unique Boss has (25-30)% increased Attack and Cast Speed Unique Boss gives 20000% increased Experience Unique Boss drops (12-20) additional Currency ItemsSo the raiders danced, leading their foe ever west, towards certain death.Travel to this Map by using it in a personal Map Device. Maps can only be used once. |
75 | 8 | ✓ |
A | 5 | The Crypt | Avatar of Apocalypse Minibosses: Avatar of Ash Avatar of Winter Avatar of Silence |
1 | Awakening Level 8 Map Tier 15 |
Map Tier: 9 Guild Character: ¾A once great monument, now a forgotten memorial.Travel to this Map by using it in a personal Map Device. Maps can only be used once. |
74 | 7 | ✗ |
C | 4 | The Chamber of Sins The Rotting Core (Maligaro's Misery) |
Maligaro the Mutilator | 1 | Awakening Level 7 Map Tier 16 |
Overgrown Shrine MapMap Level: 76 Map Tier: 9 Guild Character: Ô Item Quantity: (+80%-+100%) Item Rarity: (+220%-+250%)Area has patches of Burning Ground 20 patches with Ground Effect per 100 tiles (Hidden) Ground Effect has a radius of 14 (Hidden) Area is inhabited by Skeletons Restless Dead Undead Monsters resurrect after 10 seconds (Hidden) Area is a large Maze Area contains a Large ChestCurious, she shook it then, And tiny screams emerged. Curiouser, she shook again, And an eerie silence purred.Travel to this Map by using it in a personal Map Device. Maps can only be used once. |
74 | 7 | ✓ |
C | 2 | The Chamber of Sins | Rose Thorn |
2 | Awakening Level 7 Map Tier 16 |
Map Tier: 8 Guild Character: «Rats chase their tails for the amusement of fools.Travel to this Map by using it in a personal Map Device. Maps can only be used once. |
74 | 7 | ✗ |
A | 3 | The Grand Arena | Shredder of Gladiators Crusher of Gladiators Bringer of Blood |
3 | Awakening Level 2 Map Tier 16 |
Map Tier: 15 Guild Character: ùWe are swept ever upwards by our ambition, with no thought of what awaits us at the peak.Travel to this Map by using it in a personal Map Device. Maps can only be used once. |
82 | 15 | ✗ |
The Ascent | Mephod, the Earth Scorcher | 1 | Awakening Level 1 Map Tier 14 | ||
Map Tier: 3 Guild Character: âWho is the true criminal, the one behind bars, or the one who tortures him?Travel to this Map by using it in a personal Map Device. Maps can only be used once. |
81 | 14 | ✗ |
C | 4 | The Prison | Shock and Horror | 1 | Awakening Level 4 Map Tier 15 |
Map Tier: 15 Guild Character: ³Wealth is powerless to stop the corroding force of time.Travel to this Map by using it in a personal Map Device. Maps can only be used once. |
76 | 9 | ✗ |
C | 3 | The Sceptre of God | The High Templar | 1 | Awakening Level 1 Map Tier 14 |
Map Tier: 4 Guild Character: éThere is no war. There is no army. Only rage lingers.Travel to this Map by using it in a personal Map Device. Maps can only be used once. |
76 | 9 | ✗ |
C | 2 | The Grain Gate | The Steel Soul | 1 | Awakening Level 2 Map Tier 14 |
Map Tier: 14 Guild Character: øFrom the heart of fire, rivers of burning rage billow forth.Travel to this Map by using it in a personal Map Device. Maps can only be used once. |
82 | 15 | ✗ |
C | 4 | Kaom's Stronghold | The Infernal King | 1 | Awakening Level 2 Map Tier 15 |
Map Tier: 14 Guild Character: ûBlack monstrous bridges cross oily rivers, leading nowhere. Nothing as it should be.Travel to this Map by using it in a personal Map Device. Maps can only be used once. |
79 | 12 | ✗ |
C | 5 | The Harvest | Eater of Souls Minibosses: Prodigy of Pain Prodigy of Hexes Prodigy of Darkness |
1 | Awakening Level 6 Map Tier 15 |
| Chayula's Domain | 80 | N/A | ✗ |
N/A | 5 | The Mines | Chayula, Who Dreamt | 1 | N/A |
Map Tier: 5 Guild Character: çAs mirage becomes reality, hardship is briefly quenched.Travel to this Map by using it in a personal Map Device. Maps can only be used once. |
82 | 15 | ✗ |
The Oasis | Terror of the Infinite Drifts Minibosses: Tamipin Tamulus |
1 | Awakening Level 2 Map Tier 15 | ||
Map Tier: 10 Guild Character: œAmongst the rabble, brutality is the law.Travel to this Map by using it in a personal Map Device. Maps can only be used once. |
75 | 8 | ✗ |
C | 3 | The Slums | Hephaeus, The Hammer | 1 | Awakening Level 2 Map Tier 14 |
Map Tier: 6 Guild Character: ñBoils swell from the earth. Foul malignant flesh without purpose.Travel to this Map by using it in a personal Map Device. Maps can only be used once. |
78 | 11 | ✗ |
C | 4 | The Belly of the Beast Level 2 | Nightmare Manifest | 1 | Awakening Level 4 Map Tier 15 |
Map Tier: 13 Guild Character: ÷A brief respite in a sea of obligation and uncertainty.Travel to this Map by using it in a personal Map Device. Maps can only be used once. |
79 | 12 | ✗ |
Oriath Square | Suncaller Asha | 1 | Awakening Level 2 Map Tier 16 | ||
Map Tier: 5 Guild Character: èBlack tiles don't stain so easily.Travel to this Map by using it in a personal Map Device. Maps can only be used once. |
80 | 13 | ✗ |
B | 4 | The Lunaris Temple Level 2 (Act 3) | Piety the Empyrean | 1 | Awakening Level 5 Map Tier 15 |
Map Tier: 15 Guild Character: ðA garden on a stone pedestal. An incredible, and foolish, feat.Travel to this Map by using it in a personal Map Device. Maps can only be used once. |
80 | 13 | ✗ |
C | 4 | The High Gardens | Varhesh, Shimmering Aberration | 1 | Awakening Level 2 Map Tier 14 |
60% increased Monster Damage Area does not contain Rogue Exiles (Hidden)Travel to this Map by using it in the Templar Laboratory or a personal Map Device. Maps can only be used once. |
80 | N/A | ✗ |
B | 5 | The Ancient Pyramid | Atziri, Queen of the Vaal Q'ura Y'ara'az A'alai Vessel of the Vaal Vessel of the Vaal |
6 | N/A |
Map Tier: 14 Guild Character: ÿClear water springs forth. A moment of purity before it too gathers filth.Travel to this Map by using it in a personal Map Device. Maps can only be used once. |
82 | 15 | ✗ |
A | 4 | The Fetid Pool | two random Renegades Warband bosses with a supporting Warband |
2 | Awakening Level 8 Map Tier 15 |
Map Tier: 14 Guild Character: üLife means as little as a passing moment of entertainment. Let them rot.Travel to this Map by using it in a personal Map Device. Maps can only be used once. |
79 | 12 | ✗ |
A | 5 | Daresso's Dream The Grand Arena |
Ambrius, Legion Slayer | 1 | Awakening Level 7 Map Tier 16 |
Map Tier: 4 Guild Character: ©A sanguine supplication to death and depravity.Travel to this Map by using it in a personal Map Device. Maps can only be used once. |
78 | 11 | ✗ |
The Ossuary The Desecrated Chambers |
The Sanguine Siren | 1 | Awakening Level 6 Map Tier 15 | ||
Map Tier: 7 Guild Character: ®The trees grow twisted and gnarled, without a hint of light. A curse lingers here.Travel to this Map by using it in a personal Map Device. Maps can only be used once. |
81 | 14 | ✗ |
B | 5 | The Western Forest | The Cursed King | 1 | Awakening Level 2 Map Tier 15 |
Map Tier: 12 Guild Character: †A hollow echo of bygone times in a land where none lived long.Travel to this Map by using it in a personal Map Device. Maps can only be used once. |
78 | 11 | ✗ |
The Quarry | Stalker of the Endless Dunes Miniboss: The Vulture Queen |
1 | Awakening Level 3 Map Tier 16 | ||
Map Tier: 5 Guild Character: \Death forces even the most determined of despots to pass the crown.Travel to this Map by using it in a personal Map Device. Maps can only be used once. |
82 | 15 | ✗ |
C | 5 | The Upper Sceptre of God | God's Chosen The Hallowed Husk |
1 | Awakening Level 8 Map Tier 15 |
Map Tier: 3 Guild Character: €Drought took the plants, famine took the people.Travel to this Map by using it in a personal Map Device. Maps can only be used once. |
80 | 13 | ✗ |
B | 5 | Labyrinth Outdoors | The Goddess | 1 | Awakening Level 3 Map Tier 14 |
Map Tier: 3 Guild Character: »Built so the prayers would echo. A resonance no god could hear.Travel to this Map by using it in a personal Map Device. Maps can only be used once. |
81 | 14 | ✗ |
B | The Chamber of Innocence | Konley, the Unrepentant The Cleansing Light |
1 | Awakening Level 3 Map Tier 16 | |
Map Tier: 5 Guild Character: §Life's wet, reproductive stink abates, relenting to death's chaste ritual of decay.Travel to this Map by using it in a personal Map Device. Maps can only be used once. |
79 | 12 | ✗ |
The Belly of the Beast (Act 9) | Amalgam of Nightmares | 1 | Awakening Level 7 Map Tier 14 | ||
Map Tier: 15 Guild Character: µAt the heart of a peaceful, secluded valley, an island of burning, consuming fury.Travel to this Map by using it in a personal Map Device. Maps can only be used once. |
79 | 12 | ✗ |
A | 5 | The Karui Fortress Kaom's Stronghold |
Kitava, the Insatiable | 1 | Awakening Level 8 Map Tier 15 |
Map Tier: 3 Guild Character: 7Each plank of rotting wood, each dead sailor, feeds the island and makes it grow.Travel to this Map by using it in a personal Map Device. Maps can only be used once. |
80 | 13 | ✗ |
B | 4 | The Brine King's Reef | Nassar, Lion of the Seas | 1 | Awakening Level 8 Map Tier 16 |
Map Tier: 2 Guild Character: •From the walls, water, and ferns... Death comes crawling on ancient steps.Travel to this Map by using it in a personal Map Device. Maps can only be used once. |
80 | 13 | ✗ |
The Causeway | Armala, the Widow | 1 | Awakening Level 2 Map Tier 14 | ||
Harbinger MapMap Level: 82 Map Tier: 15 Item Quantity: (+40%-+60%) Item Rarity: (+40%-+60%)Area contains 6 extra Harbingers Corrupted Travel to this Map by using it in the Templar Laboratory or a personal Map Device. Maps can only be used once. |
82 | 15 | ✓ |
N/A | |||||
Map Tier: 16 Guild Character: ¤Area is influenced by The ShaperTravel to this Map by using it in a personal Map Device. Maps can only be used once. |
83 | 16 | ✗ |
B | 5 | The Crematorium | Guardian of the Phoenix | 1 | N/A |
Map Tier: 16 Guild Character: ¢Area is influenced by The ShaperTravel to this Map by using it in a personal Map Device. Maps can only be used once. |
83 | 16 | ✗ |
A | 5 | The Sewers | Guardian of the Hydra | 1 | N/A |
Map Tier: 16 Guild Character: £Area is influenced by The ShaperTravel to this Map by using it in a personal Map Device. Maps can only be used once. |
83 | 16 | ✗ |
A | 5 | The Caverns | Guardian of the Minotaur | 1 | N/A |
Map Tier: 16 Guild Character: ÂArea is influenced by The ShaperTravel to this Map by using it in a personal Map Device. Maps can only be used once. |
83 | 16 | ✗ |
B | 5 | Daresso's Dream | Guardian of the Chimera | 1 | N/A |
Map Tier: 16 Guild Character: >Voices. Visions. Violence. They will haunt these grounds for all of eternity.Travel to this Map by using it in a personal Map Device. Maps can only be used once. |
83 | 16 | ✗ |
C | 5 | The Ancient Pyramid | K'aj A'alai K'aj Q'ura K'aj Y'ara'az |
3 | Awakening Level 8 Map Tier 16 |
Map Tier: 17 Guild Character: ¥Travel to this Map by using it in a personal Map Device. Maps can only be used once. |
84 | N/A | ✗ |
B | 5 | Several | The Shaper | 1 | N/A |
Map Tier: 2 Guild Character: DSo much power in the hands of so few.Travel to this Map by using it in a personal Map Device. Maps can only be used once. |
71 | 4 | ✗ |
Azurite Mine | Megaera | 1 | Awakening Level 6 Map Tier 14 |
- The Hall of Grandmasters is populated by exiles submitted by Grandmaster Supporters, however these are not Unique Bosses.
Divination cards
The following divination cards can be exchanged for maps:
| Item | Stack Size | Effect(s) |
|---|---|---|
  Boundless Realms4MapBoundless is the distance between where we start and where we start again. Boundless Realms4MapBoundless is the distance between where we start and where we start again. | 4 | Map |
 Cartographer's Delight3Map Cartographer's Delight3MapMap Tier: 5A map is similar to a pair of eyes, without one you stumble around, unable to find your way. | 3 | Map Map Tier: 5 |
 Left to Fate4Map Left to Fate4MapMap Tier: 16 Unidentified CorruptedMany strive for greatness, but it is challenge, unforseen, that forges heroes. | 4 | Map Map Tier: 16 Unidentified Corrupted |
 Lingering Remnants16 Lingering Remnants16Item Level: 83 CorruptedNever dying, yet not living, Endlessly they wander beneath the harvest moon. | 16 | Item Level: 83 Corrupted |
 Lost Worlds8Map Lost Worlds8MapMap Tier: 15"There are worlds that lie beyond the edge of my page, the edge of my understanding. Worlds of wonder. Worlds of terror." Aramil - Cartographer to Emperor Chitus | 8 | Map Map Tier: 15 |
 Rain Tempter9 Rain Tempter9Item Level: 73Be like water, friend. | 9 | Item Level: 73 |
 Scholar of the Seas7 Scholar of the Seas7 | 7 | |
 Squandered Prosperity5 Squandered Prosperity5Watchstone Count: 4 Corrupted"Our rulers are being ridiculous, and we are suffering." | 5 | Watchstone Count: 4 Corrupted |
 The Arena Champion10 The Arena Champion10 | 10 | |
 The Dreamland8 The Dreamland8 | 8 | |
 The Easy Stroll2 The Easy Stroll2Modifiers: 8 Corrupted"I'm going for a walk. I'll be back soon." - Blonca's last words | 2 | Modifiers: 8 Corrupted |
 The Encroaching Darkness8Map The Encroaching Darkness8MapCorruptedNo matter where your dreams take you, Nightmare follows close behind. | 8 | Map Corrupted |
 The Explorer6Map The Explorer6MapCorruptedA map is only useful if you know where you stand. | 6 | Map Corrupted |
 The Landing5 The Landing5Map Tier: 15 CorruptedWarriors of a distant land, you embark on a journey from which you may not return, but which we will be all the better for. | 5 | Map Tier: 15 Corrupted |
 The Mayor5 The Mayor5Watchstone Count: 4A ruler is only as powerful as he is wealthy. Control the coin, control the empire. | 5 | Watchstone Count: 4 |
 The Price of Prescience5 The Price of Prescience5Map Tier: 16 Delirium: 100% CorruptedThe strange voice showed Aul a future where his legacy was forgotten, where new cultures broke themselves upon Aul's ruined world. | 5 | Map Tier: 16 Delirium: 100% Corrupted |
 The Price of Protection5Chateau Map The Price of Protection5Chateau MapWatchstone Count: 4To protect her mansion, she would cut a deal with anyone. Anything. Something answered. | 5 | Chateau Map Watchstone Count: 4 |
 The Professor4 The Professor4 | 4 | |
 The Surveyor4Map The Surveyor4MapMap Tier: 14Exploring lands made of flesh and sorrow, we'll reap and plunder like there's no tomorrow. | 4 | Map Map Tier: 14 |
 The Trial7Map The Trial7MapMap Tier: 15 CorruptedYou cannot journey to new lands until you have the courage to leave the safety of home. | 7 | Map Map Tier: 15 Corrupted |
 The Tumbleweed2 The Tumbleweed2 | 2 | |
 The Twilight Moon6 The Twilight Moon6 | 6 | |
 The Wolf's Legacy4 The Wolf's Legacy4 | 4 | |
 Treasure Hunter7 Treasure Hunter7Corrupted"Don't worry, I know what I'm doing." - Toggo's Last Words | 7 | Corrupted |
 Triskaidekaphobia13Map Triskaidekaphobia13MapMap Tier: 13 Quality: +13% Delirium: 100% Modifiers: 8 CorruptedThe Mists of Madness prey on those who harbour the deepest of fears. | 13 | Map Map Tier: 13 Quality: +13% Delirium: 100% Modifiers: 8 Corrupted |
Achievements
These achievements are related to maps:
| Name | Description |
|---|---|
| Cartographer |
Fully clear an end-game Map. |
| Dream within a Dream |
Have a Unique Map drop within a Unique Map. |
| Dream Corruption |
Corrupt a map into a Vaal Temple map. |
| Dream Enrichment |
Enhance a map with a Vaal fragment. |
| Gladiator |
Fully clear the Colosseum end-game map. |
| Hostile Territory |
Corrupt a map to have eight mods. |
| Releaser of Souls |
Kill the Eater of Souls in the Core end-game map. |
Version history
| Version | Changes |
|---|---|
| 3.9.0 |
|
| 3.1.0 |
|
| 3.0.0 |
|
| 2.5.0 |
|
| 2.4.0 |
|
| 2.3.0 |
|
| 2.1.0 |
|
| 2.0.0 |
|
| 1.2.0 |
|
| 1.0.0 |
|
| 0.10.1 |
|
| 0.10.0 |
|
| 0.9.12c |
|
| 0.9.11c |
|
| 0.9.11 |
|
References
- ↑ Chris (June 26, 2012). "Dev Diary: End-game Maps". Official Path of Exile Forums. Retrieved January 24, 2016.
- ↑ RhysGGG (March 5, 2019). "PSA: Map drops don't work as we've been let to believe (probably a bug?)". Path of Exile subreddit. Retrieved March 5, 2019.
- ↑ Qarl (May 15, 2013). 0.10.8b Patch Notes".Official Path of Exile Forums. Retrieved February 2nd, 2014
| Mechanics | |||||||||||||||
|---|---|---|---|---|---|---|---|---|---|---|---|---|---|---|---|
| Characters | |||||||||||||||
| Regions | |||||||||||||||
| Bosses | |||||||||||||||
| Quests | |||||||||||||||
| Sextants | |||||||||||||||
| Watchstones |
| ||||||||||||||
| Atlas expansions | |||||||||||||||